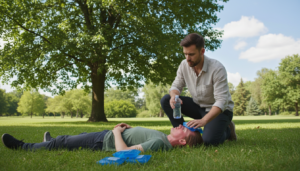
Outdoor emergencies can happen to anyone. Hikers, campers, and outdoor lovers often face unexpected situations. When someone gets hurt in the wild, you might not have professional rescue gear. That’s when improvised stretchers become essential.
Always try to keep an injured person from moving. Keep them as comfortable as possible until help arrives. This helps prevent more harm. The best thing to do is stay calm and let medical experts handle it.
In real emergencies, you must act fast. If there’s fire, flooding, or unstable ground, you need to move the injured person. Medical help might be far away. In these urgent times, makeshift stretchers made from everyday items can be a lifesaver.
Using makeshift stretchers helps keep an injured person stable while moving. You can use items from your backpack or the environment. A blanket, rope, jackets, or branches can make a strong stretcher with the right method.
Learning to make and use emergency stretcher alternatives is useful for outdoor lovers. You don’t need to be an expert adventurer. With some basic knowledge and materials, you can handle emergencies confidently. This article will teach you how to make makeshift stretchers, when to move someone, safe carrying methods, and important safety rules.
Table of Contents
Understanding When to Move an Injured Person
Deciding whether to move an injured person or wait for help is critical in wilderness emergencies. This choice can affect recovery or lead to serious complications. When you’re in the backcountry without immediate access to emergency services, consider several factors before making a decision.
Don’t rush the decision to evacuate. Take time to assess the emergency situation. Your evaluation will help decide if you need to transport the injured person or if it’s safer to stay put.
Assessing Environmental Risks and Immediate Dangers
The environment can be your biggest threat. If you face active hazards, moving the injured person might be necessary for survival. Consider these dangers:
- Falling rocks or unstable terrain
- Rising water or flooding conditions
- Fire or extreme heat exposure
- Severe weather approaching rapidly
- Avalanche danger in mountainous areas
- Extreme cold that threatens life quickly
When these threats exist, staying put is risky. In such cases, using field expedient stretchers or other emergency equipment is key to move the person to safer ground quickly and safely.
Evaluating Patient Stability Before Transport
Before moving the injured person, assess their condition carefully. Some injuries require keeping the patient completely immobile.
| Stability Indicator | Action to Take |
|---|---|
| Alert and responsive | Good sign for possible movement if other factors allow |
| Unconscious or confused | Avoid movement unless facing immediate environmental danger |
| Severe bleeding | Control bleeding first; movement may worsen condition |
| Suspected spinal injury | Never move; keep patient immobilized until professional help arrives |
| Signs of shock present | Keep warm and calm; movement can worsen shock state |
| Stable vital signs | Safer to wait for rescue teams when possible |
Spinal injuries demand special attention. Moving someone with a possible neck or back injury can cause permanent paralysis. When unsure about spinal damage, the safest approach is to keep the patient immobile and wait for trained medical professionals.
Weighing the Decision to Evacuate Versus Wait for Help
Your final decision depends on balancing several factors. Ask yourself these important questions:
- How far away is the nearest medical facility?
- Can you reach cell service to call for help?
- How many capable people do you have to assist?
- What time of day is it, and how much daylight remains?
- Are weather conditions stable or deteriorating?
- Do you have the strength to safely transport the injured person?
Research shows that even trained military personnel struggle when carrying wounded colleagues through difficult terrain. Carrying an injured person increases the risk of dropping them or causing additional injury. You also risk injuring yourself during the transport process.
According to emergency evacuation and communication strategies for improvised stretchers and transport, moving someone requires proper coordination and equipment. Most wilderness experts recommend keeping the injured person comfortable and warm while you send for help or wait for rescue teams to arrive.
In most situations, the best choice is to stay put with the injured person. Mountain rescue teams train for these scenarios. Your role is to keep the patient stable, manage pain, and prevent shock until help arrives. Use this time to document what happened, monitor vital signs, and provide reassurance to the injured person.
Essential Materials for Creating Makeshift Patient Transport
Creating field expedient stretchers requires knowing what makes a good emergency transport device. A good stretcher needs rigidity to prevent injury, durability to hold the victim’s weight, portability for easy carrying, and comfort to reduce pain. With the right mindset, you can make effective homemade rescue stretchers from everyday items.
Materials for DIY medical stretchers fall into three categories: fabric surfaces, structural supports, and binding materials. Most of these items are in your backpack or can be found in nature.
Fabric and Surface Materials
Strong fabric is the base of your stretcher. Here are the best options:
- Blankets – the most common choice for improvised stretchers
- Tarps – waterproof and extremely durable
- Sleeping bags – provide insulation and warmth
- Tent flies – lightweight and reliable
- Large jackets or multiple shirts – work well in emergencies
- Emergency bivvy bags – compact and effective
Structural Support Materials
You need rigid support for a stable stretcher. Look for these materials first:
| Material | Source | Best Use |
|---|---|---|
| Trekking poles | Your backpack | Lightweight and adjustable |
| Branches | Natural environment | At least 2 inches thick, longer than victim |
| Tent poles | Your gear | Already rigid and portable |
| Ski poles | Your equipment | Strong and readily available |
| Paddles or skis | Outdoor gear | Excellent for water or snow rescue |
Binding and Security Materials
You must secure everything together firmly. Gather these binding materials:
- Paracord – the gold standard for emergency situations
- Climbing rope – strong and reliable
- Webbing straps – excellent grip and durability
- Duct tape – versatile wilderness essential
- Torn fabric strips – improvised ties from shirts or pants
Padding and Comfort Materials
Extra clothing, foam sleeping pads, and natural materials like pine boughs add comfort. Remember, structural integrity matters more than comfort. A stretcher that collapses mid-transport is worse than the original injury. Think creatively about what you have available, and don’t hesitate to adapt materials in unexpected ways during your emergency rescue.
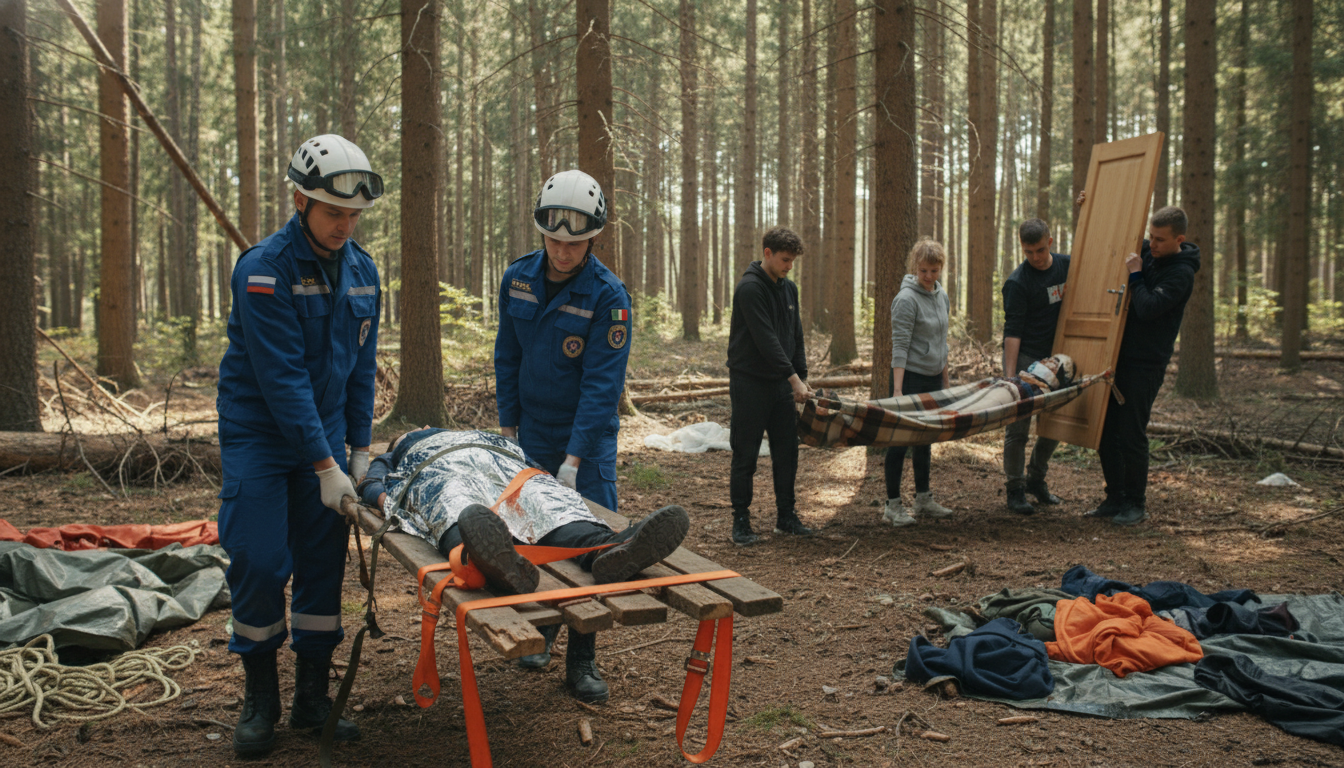
Improvised Stretchers: Types and Construction Methods
Creating homemade rescue stretchers starts with knowing their basic parts. They need two main parts: long, rigid poles and strong material stretched between them. This material stops the stretcher from sagging and keeps the victim stable.
Learning how to make improvised stretchers is useful for outdoor emergencies. The designs below are good for different situations and use common materials you might find nearby.
Blanket and Tarp Stretcher Designs
Blanket stretchers are quick to make. Lay a blanket flat and place the first pole two to three feet from one edge. Fold the edge over the pole, then put the second pole at the other edge. Fold the blanket over both poles. The victim’s weight keeps it in place.
Tarp stretchers are better for rough conditions. Spread the tarp and place the first pole two-thirds of the way across. Fold the short side over the pole, add the second pole, then fold the tarp over it. Tarps resist weather damage and tears better than blankets.
Jacket and Clothing-Based Stretchers
Use jackets when fabric pieces aren’t available. Button or zip two to three jackets for the victim’s size. Lay them in rows and thread poles through the sleeves. Add crossbars at the ends with rope lashings. This keeps people comfortable with buttons and zippers facing down.
Rope and Webbing Stretcher Techniques
Rope stretchers are good for those who know how to tie knots. Lay a rope in a zigzag pattern longer and wider than the victim. Attach rope ends to the poles with clove hitches. Thread the rope through side loops for strength. Thin poles through the loops make a mesh surface that spreads weight evenly.
| Stretcher Type | Best Materials | Construction Time | Stability Level |
|---|---|---|---|
| Blanket Stretcher | Blankets, Poles | 2-3 Minutes | Good |
| Tarp Stretcher | Tarps, Poles | 3-4 Minutes | Excellent |
| Jacket Stretcher | Jackets, Poles, Rope | 4-5 Minutes | Very Good |
| Rope Stretcher | Rope, Poles | 5-7 Minutes | Excellent |
Each design works well on different terrain and with different materials. Practice these methods before emergencies happen—try building them during camping trips or outdoor activities. Knowing how to build them means you can respond faster when someone needs help. The best temporary stretcher solutions are the ones you’ve already practiced building.
Step-by-Step Guide to Building a Blanket Stretcher
A blanket stretcher is a simple DIY medical stretcher for emergencies. It needs just a few materials and takes about two to three minutes to make. It’s great for moving someone who’s hurt because their body weight keeps the fabric in place.
Before starting, collect your materials and pick a flat, open area. Use a sturdy fabric like a heavy blanket, tarp, or sleeping bag. Avoid thin emergency blankets as they won’t support well. Check your fabric for any tears or weak spots.

Your poles should be six to seven feet long and strong. They need to hold 150 to 250 pounds without bending. Good options are sturdy branches, tent poles, or metal rods.
Construction Steps
- Lay your blanket flat on the ground in a clear workspace
- Place the first pole on the blanket about two to three feet from the right edge
- Fold the right side of the blanket over this first pole, keeping the fabric smooth and taut
- Position the second pole directly on top of the folded blanket edge to trap the fabric between the poles
- Fold the left side of the blanket over both poles, creating a triple-layer surface
- Carefully place the injured person in the center of the stretcher
- Roll the fabric ends around the poles to secure everything in place
Test your stretcher with a healthy person before using it for someone who’s hurt. Make sure the fabric stays in place and the poles don’t bend. If there are any issues, just adjust the poles a bit. Now, your DIY stretcher is ready for safe transport.
Creating Emergency Stretcher Alternatives with Jackets and Poles
When you don’t have blankets or tarps, your clothes can save lives. Jackets can turn into stretchers for hikers and outdoor lovers. They’re great for quick trips or backpacking because most people wear jackets.
Jacket stretchers are quick to make and keep you warm. They’re better than some other makeshift solutions because they keep you from getting too cold. Plus, you can make one fast if you have jackets.
Preparing Jackets for Stretcher Construction
To make a stretcher, start by collecting two or three jackets. This trick turns clothes into useful support.
Here’s how to get started:
- Invert the sleeves of each jacket so they run along the inside
- Tuck jacket sleeves completely inward to create tubes for pole insertion
- Button or zip each jacket fully to prevent opening during transport
- Position jackets with fasteners facing downward to avoid irritating the victim’s back
- Lay jackets in a line with slight overlapping to eliminate gaps
- Thread long poles or sturdy branches through the inverted sleeves
Choose the biggest jackets first. They fit poles better. Make sure the sleeves fit your poles before using it.
Adding Crossbars for Stability and Support
Adding crossbars makes your stretcher better. It makes it more stable and strong.
Here’s how to add crossbars:
- Locate or cut two shorter poles measuring 18-24 inches in length
- Position one crossbar at the head end and one at the foot end of your stretcher
- Secure crossbars using diagonal lashings—wrap rope around each intersection point in an X pattern
- Tighten lashings firmly to prevent any movement or spreading
- Test stability by applying downward pressure before loading the victim
Crossbars help keep the stretcher stable and add foot rests. Use trekking poles or ski poles if you can. Adding extra padding makes it more comfortable for the person being carried.
Safe Transport Techniques for Injured Individuals
Moving an injured person is more than just using a stretcher. The way you move them can greatly affect their safety. Even trained military find it hard to carry a wounded soldier on a makeshift stretcher. This shows the importance of proper carrying techniques.
Carrying an injured person is physically demanding. Your body mechanics and communication with others are key. Remember, this work will tire you out quickly, and that’s normal.
Two-Person and Four-Person Carry Methods
The two-person carry is useful when you have limited help. One person should be at the head and the other at the feet. Lift together and count out loud to keep the stretcher steady.
Here are tips for a two-person carry:
- Bend your knees, not your back
- Keep your back straight throughout the lift
- Match your walking pace with your partner
- Call out obstacles and hazards to each other
- Take rest breaks every 10 to 15 minutes
- Maintain constant communication about the patient’s condition
A four-person carry is more stable. Add two rescuers to the sides, gripping the poles at hip level. This is great for uneven ground or crossing streams. It spreads the weight and reduces fatigue.
Four-person carry positioning includes:
- One rescuer at the head
- One rescuer at the feet
- Two rescuers on opposite sides
- Rotate positions every 10 to 15 minutes
- Communicate constantly about terrain and fatigue levels
Dragging Techniques for Difficult Terrain
Dragging is a last resort when carrying is not possible. It’s for steep slopes, extreme fatigue, or too few rescuers. Knowing how to drag safely can save lives.
When dragging, follow these guidelines:
- Keep the victim’s head slightly elevated with padding underneath
- Pull from the head end, never from the feet
- Move slowly and steadily to minimize bouncing
- Choose the smoothest path available
- Check on the patient frequently
- Watch for the stretcher catching on obstacles
- Be aware of ground contact increasing hypothermia risk
Dragging is stressful for the patient. It means slower movement and more cold exposure. Neck strain is also a concern. Use dragging only temporarily while you rest or reassess your plan.
Professional teams often use six to eight people for tough evacuations. This shows how hard it is to move an injured person. Know your limits, stay hydrated, and take breaks when needed. Injuring yourself doesn’t help anyone, and your team needs you healthy.
Critical Safety Considerations During Emergency Evacuation
When moving an injured person, safety is key. Every choice you make can impact their survival and recovery. Knowing the right safety steps is essential for the best care in tough situations.
Securing the Injured Person
A secure patient won’t fall or slip. Use rope or webbing for chest and leg straps. This keeps them stable without hurting their breathing or blood flow. Pad any pressure points to avoid more injuries.
Before moving, check your gear and stretchers. Make sure all attachments are strong. Test the stretcher’s weight limit with your own body before adding the injured person.
Continuous Monitoring During Transport
Keep an eye on the victim’s health during transport. Look for signs like:
- Consciousness level and responsiveness
- Breathing rate and quality
- Skin color and temperature
- Pain levels and complaints
- Signs of shock (pale skin, rapid pulse, confusion)
If the patient’s condition worsens, stop immediately. Decide if it’s better to wait for help or keep moving.
Communication With the Victim
Talk to the injured person throughout the move. Explain what’s happening and ask about pain. This keeps them calm and helps you check their awareness.
Coordination Among Rescuers
Good communication among rescuers is vital. Use clear signals and designate a leader. Know each team member’s strength and fatigue. Check on hydration and nutrition too.
Don’t push yourself too hard. An exhausted rescuer can make things worse.
The Decision to Leave Someone Behind
Never leave an injured person alone. If you’re in a group, leave one person with the victim. This person can comfort them and call for help if needed.
Leaving someone behind is okay if you’re alone with a stable victim and help is coming soon. Make sure to leave them with supplies and a way to signal for help. Only do this if you’re sure help will arrive before night or bad weather.
Environmental Protection and Monitoring
Weather affects safety during evacuation. Watch for changes that could be dangerous. Protect the victim from sun, rain, and cold. Adjust your plans if the weather gets bad.
| Weather Condition | Protection Strategy | Monitoring Frequency |
|---|---|---|
| Direct Sun | Use blankets or tarps to shade the patient | Every 10-15 minutes |
| Rain or Moisture | Cover homemade rescue stretchers with waterproof materials | Continuous during rainfall |
| Cold Temperature | Layer blankets and insulate from ground | Every 15-20 minutes |
| High Heat | Keep victim hydrated and offer water regularly | Every 10 minutes |
Documentation of Care
One rescuer should track the victim’s condition. Write down injury time, treatments, and any changes. This info helps medical teams at the hospital.
Realistic Expectations About Rescue
Mountain rescue teams are trained for wilderness evacuations. Sometimes, the safest choice is to wait for trained rescuers. Improvised methods are a last resort when there’s no other option and the victim is in danger.
Conclusion
You now know how to handle wilderness emergencies with confidence. Learning to make improvised stretchers is key. It helps you help others in critical moments.
Whether hiking or camping, knowing how to make DIY medical stretchers is vital. It can mean the difference between safety and danger.
You’ve learned important skills. You know when to move an injured person and how to check the environment first. You’ve also learned how to use everyday items like blankets and rope to help.
These skills help you create a solid emergency plan. Practice them during calm times. This will help you when you’re under stress.
Take your preparation to the next level by taking a wilderness first aid course. Organizations like the Wilderness Medicine Institute or the American Red Cross offer these. They provide hands-on training that articles can’t match.
Always carry emergency supplies on outdoor adventures. This includes a first aid kit, communication devices, extra clothing, and quality rope or webbing. These items are cheap but very valuable in emergencies.
Remember, improvised stretchers are just temporary fixes. They help until professional medical care arrives. Stay calm, communicate well, and keep the injured person as steady as possible.
You’ve gained knowledge and skills that help the outdoor community. By learning these techniques, you’re not just protecting yourself and your loved ones. You’re also someone others can rely on in their worst moments. With preparation, practice, and calm decision-making, you’re ready to respond to emergencies and potentially save lives.
FAQ
When should I move an injured person versus waiting for professional rescue services?
Move an injured person only when it’s safer than waiting. Danger like fire or rising water needs quick action. But, if it’s safe, wait for professional help. Even trained people struggle with carrying the injured.
What signs indicate an injured person is stable enough to be moved?
Check if they’re conscious, breathing right, and not bleeding too much. Watch for shock signs like pale skin and rapid pulse. If unsure, it’s safer to wait for help.
What are the four key qualities every improvised stretcher needs?
Good stretchers are rigid, durable, portable, and comfortable. They must support 150-250 pounds. Comfort is important, but safety comes first.
What common materials can I use to create a makeshift patient transport device?
Use blankets, tarps, sleeping bags, and jackets. Poles and branches provide support. Paracord and duct tape help bind everything together. Add padding for comfort.
Why is the blanket stretcher often the preferred field expedient stretcher design?
It’s quick to make and needs little equipment. It uses the victim’s weight to stay in place. This makes it a reliable choice.
What should I do if I don’t have a blanket or tarp available for a stretcher?
Use jackets as a stretcher. Invert sleeves and thread poles through. Add crossbars for stability. This is useful for day hikes.
How do I prepare jackets for stretcher construction?
Invert jacket sleeves and thread poles through. Zip or button jackets to keep them closed. Overlap jackets for a secure fit.
What are crossbars and why should I add them to my improvised stretcher?
Crossbars are short poles at the stretcher’s ends. They add stability and support. They’re key for jacket stretchers.
What are the best practices for two-person carry methods?
Position one person at the head and one at the feet. Lift with your legs, not your back. Communicate about obstacles and fatigue.
How does a four-person carry improve stretcher transport?
Adding two side carriers makes it more stable. It reduces the burden on each person. This is useful on uneven terrain.
When should I use dragging techniques instead of carrying a stretcher?
Dragging is for when carrying is not possible. It’s less ideal but sometimes necessary. Move slowly and keep the victim’s head elevated.
What are the dangers of dragging a victim during emergency evacuation?
Dragging can catch on obstacles and increase hypothermia risk. It’s more likely to worsen injuries. But, it’s sometimes the only option.
How can I ensure the injured person is secure on the improvised stretcher?
Use rope to restrain the victim. Pad pressure points and keep them centered. Test the stretcher before using it.
What vital signs should I monitor during victim transport?
Check consciousness, breathing, skin color, and pain. Watch for shock signs. Stop if the victim’s condition worsens.
How should I communicate with an injured person during transport?
Explain what’s happening and ask about pain. Keep them mentally engaged. Good communication helps monitor their condition.
What communication protocols should rescuers establish during stretcher carries?
Use clear signals for lifting and stopping. Designate a leader and communicate about obstacles. This prevents mistakes.
Should I ever leave an injured person alone to seek help?
Never leave a victim alone unless in a group. If alone, leave them with supplies if help can return quickly. It’s a tough decision.
How should I protect an injured person from environmental hazards during evacuation?
Watch for weather changes and protect from sun, rain, or cold. Adjust plans if conditions are dangerous. Use clothing for insulation.
What steps should I take to prevent rescuer injury during stretcher carries?
Stay hydrated and nourished. Recognize exhaustion and don’t push too hard. Use proper lifting mechanics and take breaks.
How often should rescuers take breaks during a stretcher evacuation?
Rotate carriers every 10-15 minutes. Take more breaks as needed. Professional teams often use 6-8 people for difficult evacuations.
Should I document information about the injured person during evacuation?
Track the victim’s condition and treatments. This info is valuable for medical teams. Keep notes about what happened.
When is it appropriate to move an injured person with a suspected spinal injury?
Move only if immediate dangers require it. Suspected spinal injuries are a high risk. Wait for professional help if unsure.
What’s the difference between a blanket stretcher and a tarp stretcher?
Tarps are waterproof and durable, better for wet conditions. Blankets are easier to find and work with. Both use the victim’s weight to stay in place.
Can I use skis or paddles as stretcher poles?
Yes, if you don’t have proper poles. Skis or paddles provide the needed support. Make sure they’re sturdy and long enough.
What should I do if my stretcher poles start to bend during transport?
Stop and assess the situation. Add support or switch to a different method if necessary. Safety is more important than speed.
How can I keep a victim warm during stretcher evacuation?
Use jackets for insulation. Cover with blankets or sleeping bags. Remove wet clothing and replace with dry. Prevent hypothermia, even in mild weather.
What makes certain materials better for improvised stretchers than others?
Look for strength, flexibility, water resistance, and availability. Natural and synthetic materials differ. Choose what’s available in your environment.
How do I maintain proper body mechanics during a stretcher carry to avoid injuring myself?
Bend your knees and keep your back straight. Lift with your legs, not your back. Take regular breaks to avoid strain.