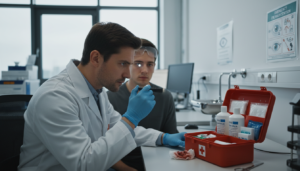
Accidents can happen anytime, anywhere. You might be hiking, camping, or in an emergency far from help. Knowing how to clean a wound is key. Wound irrigation is about using fluid to remove dirt, bacteria, and dead tissue.
Many think you need special tools to clean wounds. But, you can do it without hospital supplies. Learning to clean wounds without equipment helps you stay healthy when help is far away.
All wounds risk getting contaminated. The aim of wound care is simple. You want to remove harmful bacteria and debris without harming the healthy tissue around the injury. This is important for preventing infection and helping the wound heal.
This article will guide you through wound care in emergencies. You’ll learn about using safe water, making cleaning solutions from home, and proper irrigation methods. We’ll cover natural alternatives and step-by-step procedures. By the end, you’ll see that cleaning wounds without supplies is doable, practical, and something anyone can learn.
Table of Contents
Understanding Wound Irrigation Basics in Emergency Situations
When you get a cut or scrape, your body starts healing right away. Bleeding stops, and your immune system works hard. Knowing how to clean cuts without a first aid kit helps your body heal faster in emergencies.
Wound irrigation is flushing a wound with fluid to remove harmful stuff. It’s like rinsing dirt off a surface. This method removes bacteria and debris that can cause infections or slow healing.
Why Proper Wound Cleansing Matters for Healing
A small cut can turn into a big problem if it’s not cleaned properly. Infections happen when germs multiply too fast. Cleaning the wound removes these threats and helps your body heal.
Clean wounds heal faster and with fewer problems. Your body goes through several healing phases:
- Hemostasis (stopping the bleeding)
- Inflammation (cleaning up debris)
- Proliferation (building new tissue)
- Remodeling (strengthening the scar)
When wounds are clean, your body moves through these phases quickly. Dirty wounds get stuck in the inflammation phase, which slows healing and increases infection risk.
The Science Behind Effective Wound Cleaning
Wound irrigation works by using fluid pressure to remove bacteria and debris. Research shows this is the best way to reduce infection risk.
The science is simple: fewer bacteria means faster healing. Your immune system can handle some germs, but too many cause infections. Using improvised cleaning methods reduces bacterial load before it’s dangerous.
Keeping wounds moist is also important. Too dry or too wet can slow healing. The right moisture level helps your cells heal while keeping bacteria away.
Several things can slow healing, like bacteria, foreign bodies, poor blood flow, and your overall health. Cleaning the wound right away addresses the first two. Knowing how to clean cuts without a first aid kit means you can take charge of your healing from the start.
Cleaning Wounds Without Equipment
Even without medical supplies, you can clean wounds at home. Use water to wash away dirt and debris. This method is great for emergencies when you can’t get to a doctor.
A clean plastic water bottle is your best tool. It becomes a powerful way to clean wounds. The pressure from squeezing it helps remove dirt without harming the surrounding skin.
The Bottle Irrigation Method
Here’s how to make a simple wound irrigation system:
- Choose a clean plastic bottle (500ml or similar size works best)
- Wipe the bottle’s exterior with an alcohol wipe or clean cloth
- Use a needle, pin, or sharp object to create 10-20 small holes in an even pattern around the bottle’s top or upper side
- Fill the bottle with the cleanest water available
- Apply firm, steady pressure to squeeze water through the holes directly onto the wound
This method is great for wounds with dried blood or visible debris. It’s a cost-effective way to clean wounds without needing commercial equipment.
Important Safety Precautions
Always wear protective gear when cleaning wounds with water only:
- Gloves to protect your hands from contamination
- Face mask with eye shield to prevent water splatter
- Clean cloth or absorbent material to catch water runoff
This method is best for wounds with low infection risk. If you have deep puncture wounds, bites, or visibly contaminated injuries, see a doctor as soon as you can.
When you can’t sterilize wounds with medical supplies, use the cleanest water you can find. Remove visible debris by cleaning the wound mechanically. This helps lower the risk of infection in emergency situations.
Improvised Irrigation Solutions You Can Use at Home
When you can’t get medical supplies, your kitchen can help. You can make safe irrigation solutions at home. It’s all about knowing which water is best and mixing simple ingredients.
This section will show you how to clean wounds safely. You don’t need professional equipment.
Safe Water Sources for Emergency Wound Care
The water you use is very important. Clean water is key in any emergency. Start with the safest options and only go down if needed.
- Bottled water – Your best choice, already purified
- Boiled tap water – Boil for at least one minute, then cool
- Filtered water – Use a clean filter if you have one
- Natural water sources – Only as a last resort, from running water
Avoid dirty ponds or streams. Boiling is best when water is scarce. Let the water cool before using it on wounds.

Creating Homemade Saline Solutions
A basic saline solution is great for wound irrigation. It’s gentle on healing tissue because it matches your body’s salt level. Mix one teaspoon of non-iodized salt with one cup of cooled boiled water. Stir until the salt is fully dissolved.
| Solution Type | Recipe | Best For | Storage Time |
|---|---|---|---|
| Homemade Saline | 1 teaspoon salt + 1 cup boiled water | Most wound types, safe for all tissues | Within 24 hours |
| Sterile Water | Boiled and cooled water only | Emergency use, though less ideal than saline | Within 12 hours |
| Full-Strength Hydrogen Peroxide | Not recommended | Do not use – damages healthy tissue | N/A |
| Povidone-Iodine (Full Strength) | Not recommended | Do not use – kills healing cells | N/A |
Keep your homemade solution in a clean container. Use it within 24 hours. If it’s cloudy, smells bad, or shows signs of contamination, make a new batch. Avoid hydrogen peroxide and iodine at full strength – they harm healing cells. Stick to simple, gentle solutions that help healing.
Primitive Wound Care Techniques for Survival Situations
In a wilderness emergency, knowing how to care for wounds is key. All wounds risk getting infected. Your main goal is to clean the wound and remove dirt without causing more harm. Learning how to clean wounds in the wild can save you from serious infections when help is far away.
Finding clean water is vital. Water from streams and rivers is usually cleaner than standing water. Let water sit before drinking to let particles settle. You can also filter water through clean cloth or sand to make it clearer. For extra safety, use solar disinfection by placing water in a clear container in the sun for hours.
Creating water pressure without modern tools requires thinking outside the box. Use clean bark or leaves to channel water over the wound. Or, use clean fabric to squeeze water gently over the injury. This method cleans the wound well without causing more damage.
Removing dirt and debris needs care. Use clean twigs or cloth to carefully remove dirt and objects. Work slowly to avoid pushing dirt deeper. Knowing when to evacuate a wound is a key survival.
- Assess wound depth and bleeding severity
- Check for signs of embedded objects
- Monitor for increasing pain or swelling
- Evaluate your distance from medical care
Some plants have antiseptic properties, but identifying them safely is critical. When unsure, stick to clean water. Focus on cleaning the wound mechanically, not on herbal remedies. This approach is safer and follows established wilderness wound cleaning basics.
Step-by-Step Guide to Cleaning Wounds Using Basic Supplies
Learning to clean wounds properly is key to healing and avoiding infections. When you’re in a survival situation, knowing how to irrigate wounds and control pressure is essential. This guide will show you how to do it with items you might have at home or find in emergencies.
First, gather your supplies. You’ll need clean water or a homemade saline solution, a clean cloth or gauze, a container for runoff, and something to protect the skin around the wound. Place the injured person in a comfortable spot where you can work without them moving. Keep the area clean during the cleaning process.
Achieving Safe Irrigation Pressure Without Syringes
Getting the right pressure is important when cleaning wounds. You want a stream strong enough to remove debris and bacteria but not too strong. Aim for a pressure between 8-12 PSI for visible movement without causing harm.
Test the pressure on your hand first. The stream should feel firm but not hurt. You can create the right pressure without medical equipment in several ways:
- Hold a punctured bottle 4-6 inches from the wound and squeeze with steady, moderate pressure
- Pour from a container held about 12 inches above the wound to use gravity
- Cup water in your hand and use thumb pressure to create a directed stream
Clean the wound systematically. Start with the least contaminated areas and move to more soiled ones. This helps prevent bacteria from spreading. Keep the flow gentle but consistent until the water runs clear.
Managing Contaminated and Infected Wounds
Wounds with dirt, debris, or foreign material need more cleaning than minor cuts. Use more fluid and spend extra time flushing these wounds. Gently remove any visible foreign material with clean hands or tools.
| Wound Type | Signs to Watch For | Cleaning Approach |
|---|---|---|
| Clean Wound | Minor bleeding, clear fluid | Standard irrigation with saline solution |
| Contaminated Wound | Visible dirt, debris, or mud | Extended flushing with higher volume of fluid |
| Potentially Infected Wound | Redness, warmth, pus, or red streaks | Very thorough irrigation plus medical attention needed |
Look out for signs that mean you need medical help right away. Seek help immediately if you see deep wounds, wounds that won’t stop bleeding, wounds from animal or human bites, or clear signs of serious infection like red streaks spreading up the arm or leg.
The success of cleaning wounds in survival situations depends on three things: the solution you use, the pressure you apply, and your technique. Understanding these elements helps you do the best job possible with whatever supplies you have.
Natural Wound Cleansing Methods and Alternatives
When you can’t find medical supplies, you can use simple natural things. Knowing how to use these safely can help a lot in emergencies or survival situations.
Warm water is better than cold for cleaning wounds. It’s more comfortable and helps tissues work better. Warmth also boosts blood flow to the wound, which helps it heal. Make sure the water is clean before using it.
Natural items have been used in wound care for ages. Honey is a top choice because it fights bacteria. But, only use medical-grade honey, not the kind from the store.
Even without special tools, water can clean wounds. Gravity helps wash away dirt and germs. It’s not as good as pressurized methods, but it works when you have nothing else.
After cleaning, cover the wound to keep it safe. Use clean cotton or even large leaves if you’re in the wild. This keeps it clean and protected.
Avoid these common folk remedies despite what you’ve heard:
- Mud (introduces dangerous bacteria)
- Spider webs (harbors harmful microorganisms)
- Tobacco (contains toxic substances)
- Soil or ash (causes serious infections)
Watch your wound for signs of healing. A healthy wound looks less red, swells less, and has clear discharge. But, if it gets warm, spreads red, has pus, or smells bad, it’s infected. See a doctor right away.
Keep wounds moist but not wet. Use clean cloth dressings to keep them balanced. These methods are just for emergencies. Always go to a doctor when you can.
Conclusion
Cleaning wounds without equipment is not just possible—it’s a skill that can save lives in emergencies. You’ve learned that wound irrigation emergency techniques rely on simple principles. These include clean water, proper pressure, and careful removal of debris.
The foundation of preventing infection starts with reducing the burden of contaminants in any traumatic wound. By mastering these basic methods, you gain the ability to take action when professional medical help isn’t immediately within reach.
The bottle-puncture technique stands out as your most practical tool for cleaning wounds without equipment. This method lets you control water pressure while flushing away dirt and foreign material. Always remember to use the cleanest water source available, avoid applying pressure so hard that you damage healthy tissue, and inspect the wound carefully for anything embedded inside. Wound cleansing remains an essential component in the management of open, and attention to detail can improve your approach significantly.
Know when to seek professional care right away. Deep wounds, injuries that bleed uncontrollably, bites from animals or people, and signs of serious infection all require immediate medical attention. People with diabetes or weakened immune systems need professional evaluation for any significant wound. Even if you clean a wound well using these techniques, these situations demand expert care that you cannot provide at home.
Practice these wound irrigation emergency techniques before you actually need them. Try the bottle method on your arm or hand to understand the pressure and feel of the technique. This practice builds your confidence and muscle memory. Knowledge becomes your most powerful tool in emergencies. Knowing how to clean wounds without equipment could make the difference between a minor injury and serious infection when professional care isn’t right nearby. Always seek professional medical evaluation as soon as possible after any major injury—these emergency techniques bridge the gap until help arrives.
FAQ
Can I really clean wounds effectively without first aid kit supplies?
Yes, you can! While medical tools are best, you can clean wounds well with household items. Use clean water to flush out dirt and bacteria. Many have cleaned wounds in emergencies using just a water bottle and water.
The key is to understand how to clean wounds properly. This way, you can prevent infections.
What’s the best water source to use for cleaning wounds when I don’t have sterile saline?
Use bottled water first. If not available, boiled and cooled tap water is good. Filtered water is also safe. As a last resort, use the cleanest natural water you can find.
Avoid dirty ponds or streams. Running water is safer than stagnant water. Always choose the cleanest water you can find.
How do I create an improvised irrigation system with just a water bottle?
This is a simple trick! Use a needle to make small holes in a water bottle cap. Fill it with clean water and squeeze it to create a stream.
Hold the bottle 4-6 inches from the wound. Irrigate the wound systematically. This method cleans the wound without damaging it.
What’s the correct recipe for homemade saline solution for wound cleaning?
Mix 1 teaspoon of non-iodized table salt with 1 cup of cooled boiled water. Regular table salt works too if non-iodized isn’t available.
This solution is gentle on tissues. Cool it down before using. Store it in a clean container and use within 24 hours.
Why shouldn’t I use hydrogen peroxide or rubbing alcohol to clean wounds?
These substances can harm healing tissue. Hydrogen peroxide foams and dries out new tissue. Rubbing alcohol is too drying and can burn tissue.
Stick to clean water or saline solution for irrigation. They are safer for wound healing.
How can I clean a wound in a wilderness or survival situation where I have no equipment at all?
Use natural methods in the wild. Find clean running water. Streams and rivers are safer than stagnant water.
Use clean bark or leaves to direct water. Or squeeze water through clean fabric. Remove visible debris carefully.
If water is limited, let it flow gently. Use solar disinfection if you can. Keep the wound as clean as possible.
What pressure level is safe when irrigating wounds with improvised equipment?
Use firm but not painful pressure. Test it on your hand first. Squeeze the bottle with steady pressure from 4-6 inches away.
Hold the bottle 12 inches above the wound for gravity irrigation. Use your hands if needed. Aim for effective cleaning without damage.
How do I know if a wound needs professional medical care despite my best cleaning efforts?
Seek medical help for deep wounds, animal bites, signs of infection, or if you’re unsure. Also, if a wound doesn’t heal within 24-48 hours.
Improvised care is helpful but not a replacement for professional help. Your body’s response is key to knowing if you need medical attention.
Can I use natural remedies like honey or plants for wound cleaning in emergencies?
Honey has antibacterial properties and has been used for wound care. But regular honey may contain spores. Use it only when no other options exist.
Be cautious with plants. Many can introduce dangerous bacteria. Clean water is safer than using plants. Use plants only if you’re sure they’re safe.
How long should I irrigate a contaminated wound to ensure proper cleaning?
Irrigate contaminated wounds for at least 5-10 minutes. Use more fluid and clean from least to most contaminated areas. This reduces infection risk.
Continue until the water appears clearer. Don’t rush. Thorough irrigation is key to preventing infection.
What should I use to cover a wound after cleaning it without standard first aid supplies?
Use clean materials like cotton cloth or gauze. In survival situations, clean leaves can work. Keep the wound moist but not wet.
Change dressings when wet or contaminated. Use fresh clean material each time. This helps the wound heal.
How do I monitor a wound I’ve cleaned myself to ensure it’s healing properly?
Watch for signs of healing: less pain, swelling, and drainage. Also, look for tissue knitting together. Concerns include increasing pain, swelling, or pus.
If unsure, seek professional help. Your body’s response is a good guide to healing.
What’s the difference between proper sterilizing wounds without medical supplies and basic cleaning?
Sterilization requires medical equipment, which is not available in emergencies. Cleaning reduces bacterial load through flushing. This supports your immune system.
Proper cleaning is effective. It prepares your body to fight off infection.
Can I practice these improvised wound cleaning techniques before I actually need them?
Yes, and you should! Practice the bottle-puncture technique on your hand. This builds confidence and muscle memory.
Understanding the technique is key. Practice makes you more effective in emergencies.
How do I clean wounds without first aid kit items in different types of emergencies?
The core principle is using clean water with the right pressure. In kitchen injuries, use tap water and salt. In outdoor accidents, use natural water sources.
In disasters, use clean water you can find. In wilderness, rely on natural sources and primitive techniques. Adapt your technique based on your situation.
Why is mechanical cleaning with fluid pressure more effective than simply splashing water on a wound?
Splashing water only touches the surface. Pressurized irrigation dislodges and flushes out debris. This is why irrigation is more effective than rinsing.
Higher-pressure systems are ideal, but improvised pressure works too. The technique is as important as the clean water itself.
Should I use warm or cold water for wound irrigation without medical supplies?
Lukewarm water is best if you can manage it. It’s more comfortable and may aid healing. But clean cold water is safer than warm contaminated water.
Temperature matters less than cleanliness. Use the cleanest water available, even if it’s not ideal.
What should I avoid when cleaning wounds without professional supplies?
Avoid mud, dirt, spider webs, tobacco, ash, and other folk remedies. They introduce dangerous bacteria. Also, avoid full-strength rubbing alcohol or hydrogen peroxide.
Don’t use hot water or contaminated water sources. Use clean water and seek professional help if unsure.
How do I know if a wound needs higher-pressure or lower-pressure irrigation?
Minor wounds need gentle irrigation. Use light pressure with the bottle-squeeze technique. Contaminated wounds need more forceful irrigation.
Start with moderate pressure and adjust as needed. The wound guides your technique. Aim for effective cleaning without causing harm.