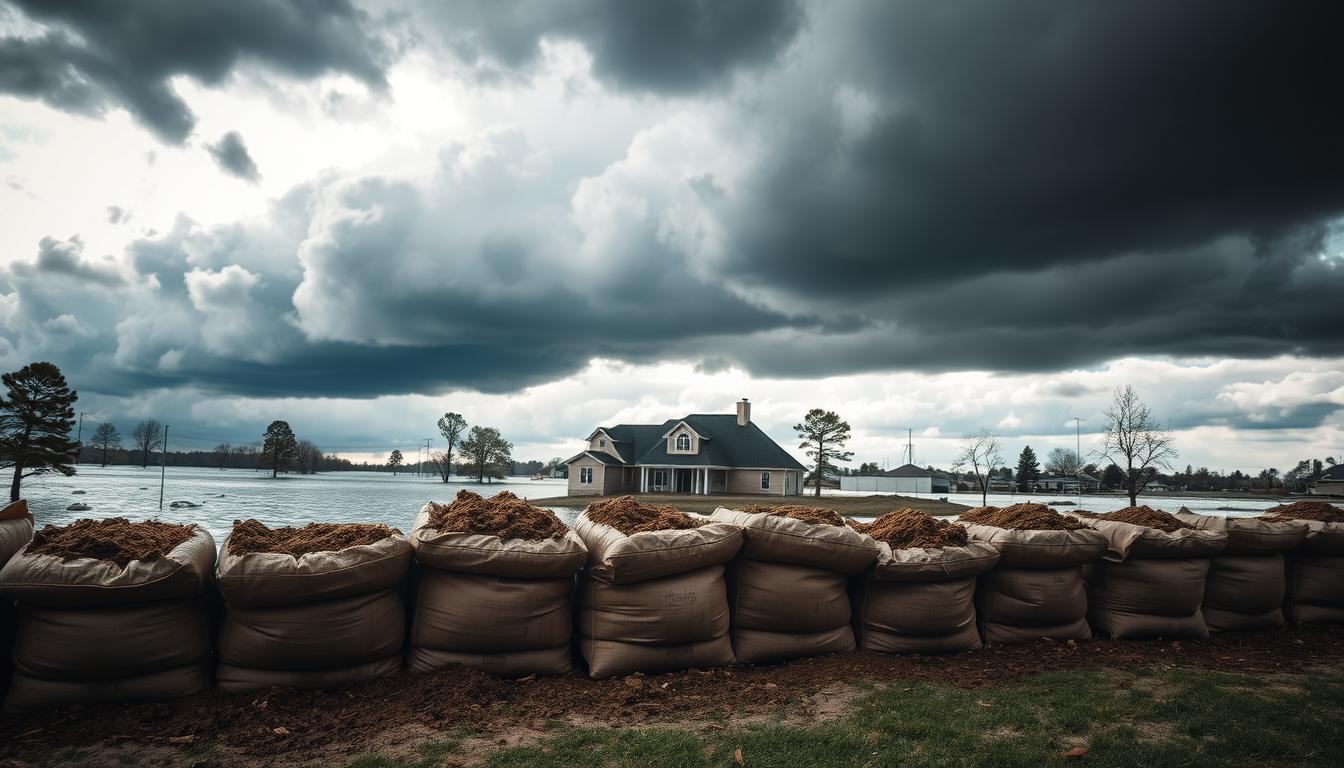
Flooding can happen fast, leaving homeowners in a rush to protect their homes. When a flood warning hits, sandbag barriers are a good fix. They help by steering floodwaters away and keeping less water out of your home.
Sandbags aren’t a foolproof way to keep water out. They won’t seal your home perfectly. But, they can cut down the water that gets in, saving your stuff and cutting down on cleanup costs.
To use sandbags effectively, you need to know what to expect. They work best as a last resort, alongside other flood protection plans. How you place and prepare them is key to keeping your home safe from floods.
The bright side is that you can sandbag your home yourself. You don’t need special skills or pricey gear. With the right tips and planning, you can defend your home against rising waters.
This guide will show you how to sandbag your home. You’ll learn how to find sandbags and where to put them. We’ll also share other flood protection ideas that go well with sandbags for the best defense.
Table of Contents
Understanding Sandbag Barriers and Their Effectiveness
Sandbags are a common choice for homeowners facing floods. It’s key to know what they can do. This knowledge helps you protect your home wisely. Knowing how to use sandbags ensures you’re ready for floods.
What Sandbags Can and Cannot Do
Sandbags help reduce water intrusion and guide water away from danger zones. They’re good for shallow to moderate floods. They give you time to move things to safety and lessen damage.
But, sandbags have limits. They can’t stop water completely. Water will find its way through small gaps. They’re not effective against fast-moving water over 6 feet per second. Strong floods can knock them down.
Building these barriers is hard work. You need at least two people to fill and place them. Two people can fill 100 sandbags in about an hour. This makes a barrier one foot tall and 20 feet long.
When to Use Sandbags for Flood Protection
Sandbags are best when you know flooding is coming. Quick action is key because water doesn’t wait. They’re good for slow-rising water, protecting spots like doorways and windows.
Don’t rely on sandbags alone for severe flooding or fast water. They’re not enough in high-velocity zones. Planning ahead is vital because filling and stacking sandbags takes a lot of time and effort.
| Flooding Scenario | Sandbag Use | Why or Why Not |
|---|---|---|
| Slow-rising water with advance warning | Recommended | You have time to fill and place sandbags before water arrives |
| Rapid water rise with little notice | Not Recommended | Insufficient time to build an effective barrier |
| Shallow to moderate flooding | Recommended | Sandbags can effectively reduce water entry at this depth |
| High-velocity water (over 6 feet per second) | Not Recommended | Fast-moving water can knock down sandbag barriers |
| Protecting doorways and vents | Recommended | Targeted protection works well for specific vulnerable points |
| Severe flooding scenarios | Not Recommended | Sandbags cannot withstand extreme water pressure |
Sandbag effectiveness depends on preparation and knowing their limits. Understanding these helps you use sandbags with other methods for better home safety.
Where to Get Sandbags and Supplies Before a Flood
It’s wise to prepare your emergency flood supplies before storm season hits. You can find sandbags at many places in your area. Local hardware stores and landscaping suppliers have them all year, making them a great choice for early preparation.
Local governments also offer sandbags during flood and storm seasons. Reach out to your city, county, fire department, or public works agency for more information. You can find specific locations by visiting the storm season safety sandbags resource guide for your region. Remember, supplies can quickly run out when flooding is near, so prepare early.
Planning ahead beats scrambling during a crisis. Buying your own sandbags early might be covered by your National Flood Insurance Program (NFIP) policy. This is a great reward for those who prepare ahead of time.
Think about using self-inflating sandbags as a modern option. They don’t need to be filled and expand when wet. They’re light, easy to store, and great for those who don’t want to lift heavy bags.
- Local hardware stores for year-round access
- Landscaping suppliers for bulk orders
- Your local government during flood season
- Self-inflating sandbags for convenient storage
Begin collecting your sandbag supplies well before flood season starts. Waiting for warnings means you’ll face competition for limited supplies.
How to Sandbag Your Home
Learning to fill and place sandbags correctly is key to protecting your home from floods. The right method turns simple materials into a strong barrier. Getting it right ensures your defense works when needed.
Filling Sandbags Correctly
Start by choosing the right material and filling your bags carefully. Sand is better than soil, clay, or gravel because it flows well and compacts tightly. If sand is not available, soil or gravel can be used, but sand is best.
Remember, fill each bag only two-thirds full. Overfilling makes bags too heavy to lift safely. A full bag should weigh 15 to 20 kilograms, which is manageable for most people.
Leave the bag’s top open. Don’t tie it shut. Open tops help bags settle together for better water seals. Bags can be tied for transport, but untie them before placing.
| Filling Method | Material Type | Weight per Bag | Best Use |
|---|---|---|---|
| Standard Fill | Sand | 15-20 kg | Primary choice for all flood barriers |
| Alternative Fill | Soil or Gravel | 15-20 kg | When sand is unavailable |
| Overloaded Fill | Any Material | Over 20 kg | Not recommended—too heavy and hard to position |
Proper Placement Techniques for Maximum Protection
Start by laying down plastic sheeting on the ground. This creates a waterproofing membrane. The plastic sheeting is your foundation.
Place sandbags on top of the plastic in staggered rows. Think of brickwork patterns where rows offset each other. This pattern prevents water from finding a direct path through cracks or gaps in your barrier.
As you build your barrier, ensure the unfilled top portion of each bag is covered by the next bag above it. The opening of each sandbag should face away from the oncoming floodwater. Fold the bag opening and tuck the flap underneath the bag’s weight. This prevents water from entering through the open top.
- Lay plastic sheeting as your waterproofing base
- Arrange sandbags in staggered rows like bricks
- Keep vertical joints from lining up between rows
- Cover unfilled bag tops with the next layer
- Point bag openings away from water source
- Tuck flaps under the bag weight
Wrapping sandbags in plastic bags adds extra water resistance. This keeps water from seeping through the burlap material. Work methodically from one end to the other, ensuring each row sits firmly and level before adding the next layer.
Strategic Locations for Sandbagging Around Your Property
Knowing where to place sandbags is key to protecting your home from floods. Most people think they need to sandbag their whole house. But, a home on a concrete slab only needs about 25 sandbags in the right spots to stay safe.
The biggest threat to your home is where water first enters. Doors and roller doors are at the highest risk. Sandbags here can block water from getting inside.

But it’s not just doors. You also need to block hidden water paths. Floor drains in bathrooms and laundry rooms can let contaminated water in. Ground-level air vents and brickwork vents are also vulnerable during floods.
Priority Protection Points
- Doorways and roller doors—first defense against floodwater
- Floor drains in laundry areas—prevents grey water backflow
- Bathroom and shower drains—stops contaminated water entry
- Ground-level air vents—blocks water from entering ventilation
- Toilet bowls—requires special protection from sewage backup
Toilets need special attention. Use a small plastic bag filled with sand in the toilet bowl. Then, weigh it down with a larger sandbag to keep sewage out.
Protecting your home from floods is more effective when you focus on key areas. You don’t need to cover your whole house. Smart placement is better than endless barriers.
Building an Effective Sandbag Wall
Building a strong sandbag wall needs careful planning and attention. The goal is to create barriers that can hold back rising water. This ensures your home stays dry during storms. Here, we’ll cover the best methods to protect your property.
Layering Techniques and Best Practices
How you arrange your sandbags is key to a good wall. Think of it like laying bricks. Each row should sit solidly on the one below it.
Begin with plastic sheeting as your base for waterproofing. Then, start stacking sandbags from one end to the other. It’s important to stagger the rows to avoid vertical seams. This pattern strengthens the wall, much like brickwork does in buildings.
Here’s how to do it right:
- Lay the first row of sandbags directly on plastic sheeting
- Tuck the unfilled top part of each bag under the next bag
- Fold the flap under at the end of each row
- Flatten down each row before adding the next layer
- Stagger your rows so the seams do not line up
Flattening each layer before adding the next compresses the bags. This makes your wall stronger against water pressure. It only takes a few minutes but is worth it.
Protecting Doorways While Maintaining Access
Your doors need protection, but you also need to be able to enter and exit. The solution is a small sandbag wall across doorways that allows one door to open.
Plan your doorway protection carefully:
- Build the wall two sandbag rows high across most doorways
- Adjust height based on expected flood depth in your area
- Position one wall so the door can swing open over it
- Leave at least one accessible exit for emergencies
This approach balances safety and practicality. You get flood protection while keeping escape routes clear. Working with a partner makes stacking sandbags easier and faster. Even if you’ve never done this before, you can protect your home with patience and the right technique.
Additional Flood Protection Measures Beyond Sandbagging
Sandbags are just one part of keeping your home safe from floods. To really protect your family and belongings, you need more than just sandbags. It’s about creating a strong defense system for your whole home.
Begin by moving important items to higher places or elevated areas before the flood hits. This simple step helps save your precious things and lowers stress during a flood. Clear out low cupboards, lift curtains, and roll up rugs near doors. Move electronics, documents, and special items to safer spots as soon as flood warnings come out.
Turning off electricity and gas at the main switch is key to avoiding fires and electrical dangers. Make sure you know where these switches are before a flood happens.
Creating Your Disaster Plan
Having a detailed plan for emergencies is essential. It should list all the steps your family needs to take to stay safe. Knowing how long each task takes helps avoid last-minute chaos. Your plan should cover sandbag setup, moving valuables, and turning off utilities.
- Inspect all flood protection materials annually
- Test that all sandbag barriers and flood shields work properly
- Train household members on their assigned responsibilities
- Verify everyone is physically able to complete their tasks
- Confirm all necessary parts and supplies are available
Once your home is as protected as possible, evacuate to higher ground right away. You can fix property damage, but you can’t replace lives. Your safety is the most important thing.
Safe Disposal and Storage of Sandbags After Flooding
After the floodwaters go down, many people wonder what to do with their sandbags. It’s important to dispose of and store them safely. This protects your health and the environment. The right choices during cleanup can help avoid future problems.
Sandbags that got wet in the flood need special care. Floodwater can carry harmful stuff like sewage and chemicals. These can soak into the sand and bags, posing health risks. So, contaminated sandbags should not go in regular trash or recycling bins.
Handling Contaminated Sandbags
Any sandbag that got wet in the flood needs careful handling. Wear gloves and protective clothes when you touch them. Never use a sandbag again, even if it looks clean and dry.
For proper disposal, contact your local council. They can tell you how to handle contaminated sandbags. Many places treat them as hazardous materials. Your local government can also tell you about collection services or where to dispose of them.
Unused sand can be used as topsoil for your lawn or garden. Just make sure to keep it away from storm drains to avoid runoff problems.
Storage Tips for Future Use
Store sandbags in a dry place, away from sunlight. Wet bags rot fast and become useless. Sunlight can also damage the fabric over time.
- Keep bags in a shed, garage, or covered area
- Ensure good air circulation around stored bags
- Check bags regularly for mold or decay
- Replace bags showing signs of damage
Proper storage of sandbags means your flood preparation efforts will last for years.
Conclusion
Sandbags are a great way to protect your home from floods. This guide has shown you how to use them effectively. Now, you know how to act quickly when floods happen.
Being ready for emergencies can make a big difference. Get your sandbags ready before flood season starts. Practice using them with your family. Make a plan for when to use sandbags and when to leave.
Keep important phone numbers handy. These steps may take time, but they save lives. Remember, sandbags are just one part of protecting your home.
Always think about your neighbors when protecting your home. Don’t let floodwater harm their property. Remove sandbags after the danger passes to avoid problems.
You can make a big difference in keeping your family safe. Use the tips from this guide to feel more confident. Contact local emergency management for advice. Start preparing now for the storms ahead. Your home and peace of mind are worth it.
FAQ
What exactly is sandbagging and how does it protect my home from flooding?
Sandbagging is a way to protect your home from flooding. It involves placing sandbags around your home to block water. These bags help divert water and slow it down, protecting your home.
But, remember, sandbags don’t make your home completely waterproof. They help reduce damage, not prevent it. When used correctly, they can keep a lot of water out, giving you time to move things and protect your home.
Can sandbags really prevent all flood damage to my home?
No, sandbags can’t stop all flood damage. They work best against slow-moving water and shallow flooding. But, they can’t handle fast-moving water or severe flooding.
Even with proper installation, sandbags don’t block water completely. They’re more like a damage-reducing tool. So, always have a bigger plan to protect your home, like moving things to higher places and turning off utilities.
How much advance warning do I need to sandbag my home effectively?
You need a few hours of warning to sandbag your home. It takes about an hour for two people to set up a 20-foot barrier. So, you need at least 4-6 hours to get everything ready.
It’s better to prepare early. Buy sandbags and materials when they’re not in demand. This way, you can act fast when flooding is predicted.
Where can I get sandbags before flood season arrives?
You can get sandbags from local hardware stores and landscaping suppliers. They usually have them all year. Some local governments also give out sandbags during flood season.
But, don’t rely only on these sources. Buy your own supplies early. Self-inflating sandbags are a good alternative. They’re easy to use and store for a long time.
What’s the cost of sandbagging materials, and will my flood insurance cover it?
Sandbag costs vary. Pre-filled bags cost between
FAQ
What exactly is sandbagging and how does it protect my home from flooding?
Sandbagging is a way to protect your home from flooding. It involves placing sandbags around your home to block water. These bags help divert water and slow it down, protecting your home.
But, remember, sandbags don’t make your home completely waterproof. They help reduce damage, not prevent it. When used correctly, they can keep a lot of water out, giving you time to move things and protect your home.
Can sandbags really prevent all flood damage to my home?
No, sandbags can’t stop all flood damage. They work best against slow-moving water and shallow flooding. But, they can’t handle fast-moving water or severe flooding.
Even with proper installation, sandbags don’t block water completely. They’re more like a damage-reducing tool. So, always have a bigger plan to protect your home, like moving things to higher places and turning off utilities.
How much advance warning do I need to sandbag my home effectively?
You need a few hours of warning to sandbag your home. It takes about an hour for two people to set up a 20-foot barrier. So, you need at least 4-6 hours to get everything ready.
It’s better to prepare early. Buy sandbags and materials when they’re not in demand. This way, you can act fast when flooding is predicted.
Where can I get sandbags before flood season arrives?
You can get sandbags from local hardware stores and landscaping suppliers. They usually have them all year. Some local governments also give out sandbags during flood season.
But, don’t rely only on these sources. Buy your own supplies early. Self-inflating sandbags are a good alternative. They’re easy to use and store for a long time.
What’s the cost of sandbagging materials, and will my flood insurance cover it?
Sandbag costs vary. Pre-filled bags cost between $1-$3 each. If you buy sand and bags separately, prices depend on where you are and how many you need.
Some flood insurance policies cover sandbag costs. Check your policy to see if you’re covered. Buying supplies early can save you money and give you peace of mind.
What’s the difference between filling sandbags with sand versus soil, clay, or gravel?
Sand is the best material for filling sandbags. It flows well and compacts to create a strong barrier. Soil, clay, and gravel can work, but they’re not as good.
Clay clumps, soil settles, and gravel doesn’t stick well. If you can’t get sand, these materials are better than nothing. But, sand is always the best choice.
How full should I fill each sandbag?
Fill each sandbag two-thirds full. This makes them heavy enough to handle but not too heavy. The empty space lets the bags mold together for a better seal.
Overfilling makes the bags too heavy and hard to move. It also lets water through. Proper filling is key to a good barrier.
Should I tie the tops of my sandbags closed?
No, don’t tie the tops of your sandbags. Leave them open so they can mold together. This creates a stronger barrier against water.
Tying the tops makes the barrier weaker. It’s better to leave them open for a better seal.
What’s the proper pattern for stacking sandbags?
Stack sandbags in a staggered pattern, like bricklaying. This makes the barrier stronger and more stable. Start with plastic sheeting as a waterproof base.
Place the first row of sandbags on the sheeting. For the second row, position bags so they cross two bags in the first row. Keep this pattern for each layer. It’s more effective than just stacking them.
Which direction should the open end of each sandbag face?
The open end of each sandbag should face away from the water. Position them so the unfilled part is tucked under the bag’s weight. This prevents water from getting in.
Make sure the sand-filled part faces the water. This creates a stronger barrier. Proper orientation is important for effectiveness.
How many sandbags will I actually need for my home?
Most homes need fewer than 25 sandbags for protection. Focus on vulnerable points like doorways and vents. The exact number depends on your home’s layout and flood depth.
Don’t try to cover your whole home. It’s unnecessary and could trap water. Homes on slabs usually need less protection. For homes on stumps or with timber construction, more protection is needed. Check with your local floodplain manager for advice.
What’s the proper way to protect my doorways with sandbags while being able to get in and out?
Build a two-row high wall of sandbags around doorways. Make sure at least one door can open over the barrier. This allows for quick exit during an evacuation.
Position the bags so there’s a gap for the door. This is important for quick evacuation. With the right technique, you can create an effective barrier without sealing yourself in.
How do I protect floor drains and vents from allowing floodwater back into my home?
Place sandbags over floor drains and vents to block water. For toilets, use a small bag of sand in the bowl and a larger bag on top. This prevents sewage backflow.
Brickwork vents near the ground should also be covered. These steps protect hidden vulnerability points that many forget about.
How should I flatten sandbag rows to improve barrier effectiveness?
Flatten each row of sandbags before adding the next. You can do this by walking on them or using a tool. This makes the barrier more stable and water-resistant.
Flattening removes air gaps that water could seep through. Start from one end and work your way across. The plastic sheeting underneath is your main waterproof layer.
What’s the role of plastic sheeting in effective sandbagging?
Plastic sheeting is the foundation of your sandbag barrier. Lay it down before placing the first row of sandbags. It prevents water from seeping underneath.
The sandbags then provide weight and structure to hold the plastic in place. This combination creates a stronger barrier than sandbags alone. Without plastic, water can easily get underneath.
Beyond sandbagging, what other steps should I take to protect my home from flooding?
Sandbagging is just one part of protecting your home. Move valuables to higher floors, turn off utilities, and evacuate when necessary. These steps are critical for safety.
Also, lift curtains, remove items from low cupboards, and roll up rugs. This minimizes damage. Always put your safety first and evacuate if needed.
How should I plan my flood preparedness actions to ensure nothing gets forgotten?
Create a detailed disaster plan with each action and its time estimate. This helps you plan and avoid panic. Share the plan with everyone in your household.
Practice the plan before flood season to ensure everyone knows what to do. Update it annually to keep it relevant. A well-planned response is more effective than last-minute actions.
What’s the most important thing to remember about flood safety?
Always prioritize personal safety. Property can be replaced, but lives cannot. Protect your home as much as you can, then evacuate if necessary.
Don’t wait for orders to evacuate if you feel unsafe. Prepare your evacuation plan early and keep an emergency kit ready. Remember, your safety is the most important thing.
How do I safely handle sandbags that have been exposed to floodwater?
Treat sandbags that have touched floodwater as contaminated. Floodwater can contain harmful substances. Always wear protective gear when handling them.
Don’t reuse sandbags that have been in floodwater. Contact your local council for proper disposal. Hazardous waste facilities can handle them safely.
What should I do with sand from unused or uncontaminated sandbags?
Clean sand can be used as topsoil for your lawn or garden. Spread it away from storm drains. But, make sure it hasn’t touched floodwater first.
If you’re unsure, treat it as contaminated. Dispose of it properly according to your local council’s guidelines.
How should I properly store sandbags for future use?
Store sandbags in a dry place, away from sunlight. Damp bags will rot quickly. UV light weakens the material.
Check stored bags periodically for dryness. Self-inflating sandbags are a good option. They don’t need dry storage and can last for years.
What does “no adverse impact” mean in the context of flood protection?
“No adverse impact” means your flood protection shouldn’t harm your neighbors. Make sure water flows away from their properties. This is a legal and ethical duty.
Before building barriers, think about how water will flow. If your barriers could harm neighbors, adjust your plan. Being considerate of others is important during flood preparation.
– each. If you buy sand and bags separately, prices depend on where you are and how many you need.
Some flood insurance policies cover sandbag costs. Check your policy to see if you’re covered. Buying supplies early can save you money and give you peace of mind.
What’s the difference between filling sandbags with sand versus soil, clay, or gravel?
Sand is the best material for filling sandbags. It flows well and compacts to create a strong barrier. Soil, clay, and gravel can work, but they’re not as good.
Clay clumps, soil settles, and gravel doesn’t stick well. If you can’t get sand, these materials are better than nothing. But, sand is always the best choice.
How full should I fill each sandbag?
Fill each sandbag two-thirds full. This makes them heavy enough to handle but not too heavy. The empty space lets the bags mold together for a better seal.
Overfilling makes the bags too heavy and hard to move. It also lets water through. Proper filling is key to a good barrier.
Should I tie the tops of my sandbags closed?
No, don’t tie the tops of your sandbags. Leave them open so they can mold together. This creates a stronger barrier against water.
Tying the tops makes the barrier weaker. It’s better to leave them open for a better seal.
What’s the proper pattern for stacking sandbags?
Stack sandbags in a staggered pattern, like bricklaying. This makes the barrier stronger and more stable. Start with plastic sheeting as a waterproof base.
Place the first row of sandbags on the sheeting. For the second row, position bags so they cross two bags in the first row. Keep this pattern for each layer. It’s more effective than just stacking them.
Which direction should the open end of each sandbag face?
The open end of each sandbag should face away from the water. Position them so the unfilled part is tucked under the bag’s weight. This prevents water from getting in.
Make sure the sand-filled part faces the water. This creates a stronger barrier. Proper orientation is important for effectiveness.
How many sandbags will I actually need for my home?
Most homes need fewer than 25 sandbags for protection. Focus on vulnerable points like doorways and vents. The exact number depends on your home’s layout and flood depth.
Don’t try to cover your whole home. It’s unnecessary and could trap water. Homes on slabs usually need less protection. For homes on stumps or with timber construction, more protection is needed. Check with your local floodplain manager for advice.
What’s the proper way to protect my doorways with sandbags while being able to get in and out?
Build a two-row high wall of sandbags around doorways. Make sure at least one door can open over the barrier. This allows for quick exit during an evacuation.
Position the bags so there’s a gap for the door. This is important for quick evacuation. With the right technique, you can create an effective barrier without sealing yourself in.
How do I protect floor drains and vents from allowing floodwater back into my home?
Place sandbags over floor drains and vents to block water. For toilets, use a small bag of sand in the bowl and a larger bag on top. This prevents sewage backflow.
Brickwork vents near the ground should also be covered. These steps protect hidden vulnerability points that many forget about.
How should I flatten sandbag rows to improve barrier effectiveness?
Flatten each row of sandbags before adding the next. You can do this by walking on them or using a tool. This makes the barrier more stable and water-resistant.
Flattening removes air gaps that water could seep through. Start from one end and work your way across. The plastic sheeting underneath is your main waterproof layer.
What’s the role of plastic sheeting in effective sandbagging?
Plastic sheeting is the foundation of your sandbag barrier. Lay it down before placing the first row of sandbags. It prevents water from seeping underneath.
The sandbags then provide weight and structure to hold the plastic in place. This combination creates a stronger barrier than sandbags alone. Without plastic, water can easily get underneath.
Beyond sandbagging, what other steps should I take to protect my home from flooding?
Sandbagging is just one part of protecting your home. Move valuables to higher floors, turn off utilities, and evacuate when necessary. These steps are critical for safety.
Also, lift curtains, remove items from low cupboards, and roll up rugs. This minimizes damage. Always put your safety first and evacuate if needed.
How should I plan my flood preparedness actions to ensure nothing gets forgotten?
Create a detailed disaster plan with each action and its time estimate. This helps you plan and avoid panic. Share the plan with everyone in your household.
Practice the plan before flood season to ensure everyone knows what to do. Update it annually to keep it relevant. A well-planned response is more effective than last-minute actions.
What’s the most important thing to remember about flood safety?
Always prioritize personal safety. Property can be replaced, but lives cannot. Protect your home as much as you can, then evacuate if necessary.
Don’t wait for orders to evacuate if you feel unsafe. Prepare your evacuation plan early and keep an emergency kit ready. Remember, your safety is the most important thing.
How do I safely handle sandbags that have been exposed to floodwater?
Treat sandbags that have touched floodwater as contaminated. Floodwater can contain harmful substances. Always wear protective gear when handling them.
Don’t reuse sandbags that have been in floodwater. Contact your local council for proper disposal. Hazardous waste facilities can handle them safely.
What should I do with sand from unused or uncontaminated sandbags?
Clean sand can be used as topsoil for your lawn or garden. Spread it away from storm drains. But, make sure it hasn’t touched floodwater first.
If you’re unsure, treat it as contaminated. Dispose of it properly according to your local council’s guidelines.
How should I properly store sandbags for future use?
Store sandbags in a dry place, away from sunlight. Damp bags will rot quickly. UV light weakens the material.
Check stored bags periodically for dryness. Self-inflating sandbags are a good option. They don’t need dry storage and can last for years.
What does “no adverse impact” mean in the context of flood protection?
“No adverse impact” means your flood protection shouldn’t harm your neighbors. Make sure water flows away from their properties. This is a legal and ethical duty.
Before building barriers, think about how water will flow. If your barriers could harm neighbors, adjust your plan. Being considerate of others is important during flood preparation.