Rocket stoves are amazing cooking tools that turn small twigs into powerful heat. They burn wood almost completely, reaching high temperatures. You can cook a whole meal with just a handful of sticks.
Building a rocket stove is easy and cheap. You can make one in a day or two using stuff you likely have at home. It’s a great skill for emergencies, camping, or as a backup cooking option.
Rocket stoves are special because they make very little smoke and burn fuel efficiently. Even small twigs become useful fuel. People at emergency fairs and campers love them for their reliability and ease of use.
This guide will teach you everything you need to know. You’ll learn the science behind these stoves and how to build one. Plus, you’ll see how to cook amazing meals with minimal fuel.
Anyone can learn this skill. You don’t need experience or special training. With the right knowledge, you’ll have a stove that lasts for years. Let’s start your journey to efficient, eco-friendly cooking.
Table of Contents
What Makes Rocket Stoves Different from Traditional Wood Stoves
Rocket stoves work differently than old-fashioned fireplaces or wood stoves. They use more oxygen, leading to better burns. This means they use less fuel and make less smoke.
People want to build rocket stoves because they’re so efficient. They burn wood better and waste less. This is a big improvement over old ways.
The Science Behind Complete Combustion
Traditional stoves let smoke and soot go up the chimney. But rocket stoves do something special. They burn these gases again in a hot tunnel, making more heat.
This hot tunnel is where the magic happens:
- Wood releases volatile gases and particles
- These compounds are sucked into the hot burn tunnel
- Complete combustion occurs at high temperatures
- Extra heat energy gets released into the system
- Only carbon dioxide exits through the chimney
Why Rocket Stoves Produce Minimal Smoke
Smoke is unburned fuel. When you see a lot of smoke, it’s wasted energy. Rocket stoves, on the other hand, are very efficient.
Here’s how they compare:
| Feature | Traditional Wood Stove | Rocket Stove |
|---|---|---|
| Air Intake | Small and restricted | Open and abundant |
| Combustion Type | Incomplete and cool | Nearly complete and hot |
| Smoke Production | Heavy | Minimal |
| Creosote Buildup | Significant | Minimal |
| Fuel Efficiency | 40-60% | 80-90% |
When a rocket stove burns well, what comes out is mostly carbon dioxide and water vapor. This means it’s using fuel efficiently and not polluting much.
The Unique Roaring Sound and Airflow Design
The sound of a rocket stove is unmistakable. It’s like a small rocket engine. This sound means it’s working at its best.
The design behind this sound is simple:
- Wood feeds into an open chamber with plenty of oxygen access
- The fire ignites and heats the burn tunnel walls
- Hot air rises rapidly up the heat riser
- This rising air creates suction, pulling more air through the system
- The effect mimics a powerful air-blower pointed directly at the flames
This airflow pattern is key to the rocket stove’s success. As the tunnel gets hotter, it pulls in more oxygen. This keeps the fire burning strong without any extra help.
Insulation is very important. It keeps the heat in and the temperatures high. When building a rocket stove, insulation is a top priority. This design is why rocket stoves are popular for their efficiency and low environmental impact.
How to Build a Rocket Stove
Building a rocket stove is a fun project that can be done in a day or two. You can make a stove from almost nothing if you like to find useful items. Many plans use simple designs with items you might have at home.
You don’t need to be a metal expert or have expensive tools. A simple guide will show you how to make a stove from cans and insulation. The stove is light, weighing about one pound, perfect for camping or emergencies.
This design is easy to make. You stack cans to form a chamber, cut holes for airflow, add insulation, and create a fuel shelf. These designs have been tested and improved by many DIY fans in the U.S., proving they work well.
What You’ll Need
Getting the materials for your rocket stove is easy:
- One #10 can with lid for the main body
- Two large 28oz cans for the combustion chamber
- One extra can for the fuel shelf
- Insulation material (perlite or sand)
- Tin snips for cutting
- Heavy-duty gloves for safety
- Marker for marking cut lines
- Wire hanger for a handle
- Optional high-heat spray paint for finishing
To build it, cut holes in cans, make a feed tube and burn tunnel, add insulation, and finish with a handle. Your DIY plans will help you through each step. This design is great for beginners who want to cook efficiently.
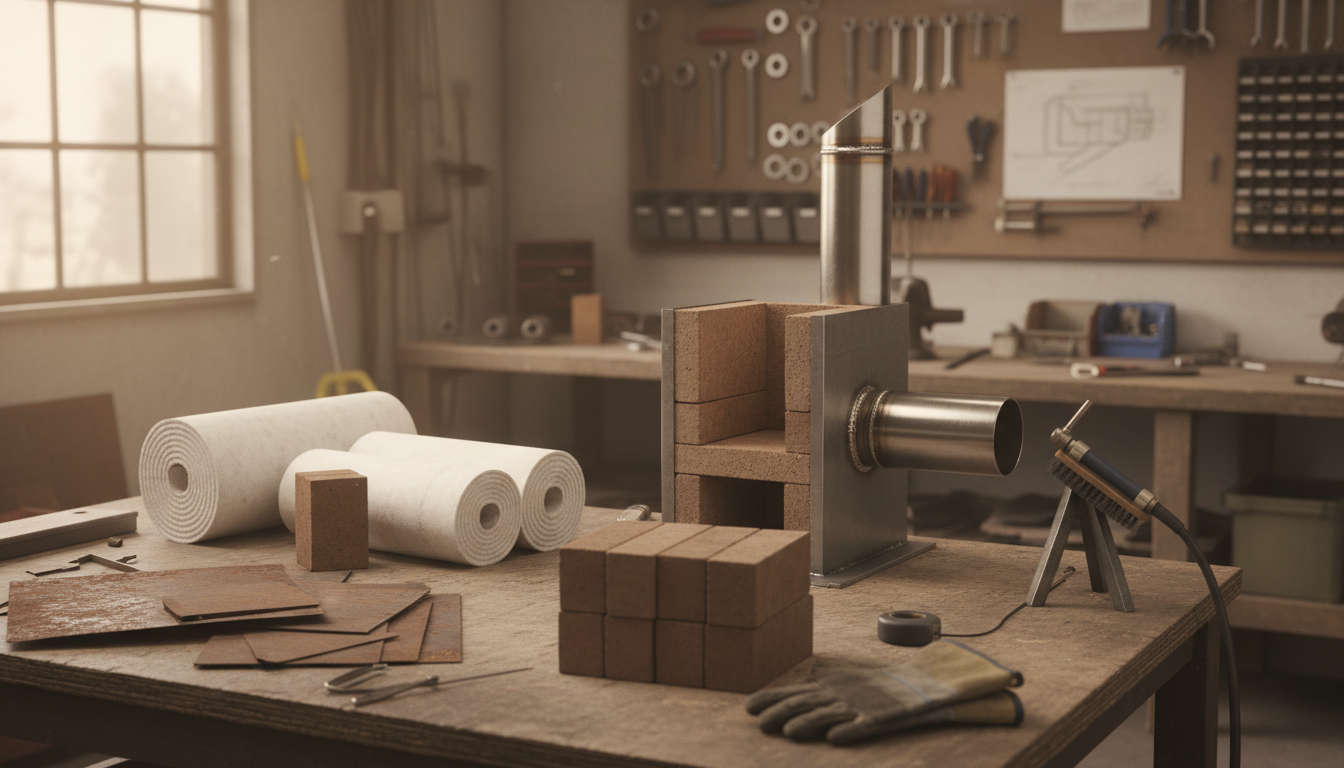
Essential Materials and Tools for DIY Rocket Stove Construction
Building a homemade rocket stove is a fun project that won’t cost much. You can find most materials around your house, in recycling bins, or for free. This way, you can make a powerful cooking tool without spending a lot. Let’s look at what you need and why it’s important.
Choosing the Right Cans and Metal Components
The base of your rocket stove is the right cans. A #10 can is your outer shell. It’s big, holding about 3 quarts, and perfect for the stove’s body. You can get these cans for free from restaurants, schools, and food canneries. Many grocery stores also sell products in #10 cans that you can save.
Two large 28-ounce cans make the feed tube and burn tunnel. You can find these at any grocery store. Make sure they don’t have rust or dents that mess up their shape.
| Component | Size/Type | Purpose | Where to Find |
|---|---|---|---|
| Outer Shell | #10 Can | Main body structure | Restaurants, schools, recycling |
| Feed Tube | 28oz Can | Fuel entry point | Grocery stores, home pantry |
| Burn Tunnel | 28oz Can | Combustion chamber | Grocery stores, home pantry |
| Shelf Material | Extra Can | Support platform | Recycling, kitchen storage |
Steel cans are better than aluminum because they handle heat well without warping. A wire hanger makes your handle. Tin snips cut your metal pieces. Keep a marker ready for marking cut lines.
Insulation Options for Maximum Heat Retention
Insulation is key for efficient cooking. Without it, heat escapes, and your stove won’t get hot enough. Check your attic for fiberglass insulation. It works well with safety gloves and a mask.
Other good insulation options include:
- Vermiculite from gardening stores
- Perlite as a lightweight choice
- Wood ash from fireplaces
- Sand from hardware stores
- Dirt from your yard in emergencies
Choose materials that won’t catch fire and can handle high temperatures. Avoid anything that melts or breaks down easily.

For tools, tin snips are your main cutter. But you can also use aviation snips, angle grinders, or hacksaws. Always wear heavy-duty gloves when cutting metal. Optional high-heat spray paint adds a nice finish, but it’s not needed for the stove to work.
The best part of making a homemade rocket stove is using materials you already have or can find for free. This makes a great cooking solution available to everyone.
Creative Applications for Your Homemade Rocket Stove
Learning to build a rocket stove opens up a world of possibilities. It’s not just for cooking anymore. You can use your skills for outdoor fun, being ready for emergencies, and living sustainably.
A rocket stove is great for camping and outdoor fun. It’s easy to carry and doesn’t need heavy fuel. It keeps you warm and fed, even when you’re far from home.
With rocket stove skills, you can turn your outdoor area into a full kitchen. Here are some cool things you can do:
- Build a rocket oven in a 44-gallon barrel for baking
- Make a hot water system with copper coils for outdoor showers
- Build a rocket mass heater to warm rooms with little wood
- Set up BBQ areas with cast iron or copper plates
- Make emergency cooking systems for when the power goes out
Teaching kids about fire safety and cooking with a rocket stove is fun. They learn important skills in a safe way. It makes family time more exciting with outdoor cooking.
Online, you can find rocket stove projects and ideas from others. These groups connect people who want to live sustainably. Start with your basic stove and then try new things. You’ll see how versatile rocket stoves really are.
Operating Your Rocket Stove for Efficient Cooking
Now that you’ve built your portable rocket stove, it’s time to cook. Using a rocket stove is easy and fun. Your stove can get hot enough to cook food in just six minutes. To cook well, you need to know about fuel, fire care, and cooking techniques.
Fuel Selection and Preparation Tips
One great thing about rocket stoves is they use waste wood. You don’t need big logs. Instead, use small twigs and thin branches.
Preparing fuel is simple:
- Cut wood into 6-12 inch pieces
- Make sure the wood is dry
- Have plenty of fuel ready
- Keep fuel dry and away from moisture
- Use wood from pruned trees and shrubs
- Save scrap wood from projects
Just a handful of twigs can cook a meal. This makes rocket stoves great for camping or emergencies. Save branches from pruning to use for cooking.
Lighting and Maintaining the Perfect Fire
Starting your stove is easy. Put small kindling on the internal shelf. Never put fuel below this shelf for good airflow.
Here’s how to light it:
- Use tinder like dryer lint or small paper
- Put tinder on the shelf with twigs around it
- Light tinder with a match or lighter
- Watch as flames grow and the stove heats up
- Listen for the roaring sound as airflow increases
- Feed sticks into the feed tube as needed
Keeping the fire going is easy. Just add new sticks as they burn. This keeps the heat steady. The strong updraft is a sign of good airflow, making the stove efficient.
Cooking Techniques and Temperature Control
Put pots and pans over the heat riser opening. Rocket stoves heat up fast, so water boils quickly. Start with simple tasks like heating water before trying more complex dishes.
| Cooking Task | Temperature Range | Time Required | Fuel Amount |
|---|---|---|---|
| Boiling water for tea | 100°C | 3-5 minutes | Small handful of twigs |
| Heating soup or stew | 80-100°C | 8-10 minutes | Moderate handful of twigs |
| Cooking rice or pasta | 100°C sustained | 15-20 minutes | Continuous small feeding |
| Baking or simmering | 150-200°C | 20-30 minutes | Regular fuel feeding |
| High-heat searing | 250°C or higher | 5-10 minutes | Aggressive fuel feeding |
Adjust the fuel to control the temperature. Add more wood for high heat or less for low. If food cooks too fast, remove the pot to cool it down. Cast iron cookware is great for rocket stoves.
Be safe with your rocket stove. It gets very hot, so keep kids and pets away. Use gloves for hot cookware. Place the stove on a stable surface. Always have water or a fire extinguisher nearby, though these stoves are very clean.
Your first time cooking with a rocket stove will amaze you. Start simple, be patient, and you’ll get the hang of it.
Conclusion
You now know how powerful rocket stoves are for cooking and heating. They turn small twigs and scrap wood into hot flames. Learning to build one is a skill that lasts forever.
Building a rocket stove is easy and can be done with recycled materials. This means you can make one without spending much money.
Rocket stoves are better than traditional cooking methods in many ways. They burn fuel efficiently, producing less smoke and pollution. They also use very little wood to create strong heat.
These stoves are great for emergencies, camping, or everyday outdoor cooking. You can even grill bacon outside. For meal ideas, check out articles on perfect meals and easy recipes for rocket stoves.
Building your first rocket stove is a fun project that can be done in a weekend. Check out the guide on how to build a rocket stove. With the right materials and steps, you’ll have a reliable cooking tool.
By building a rocket stove, you join a global community of sustainable living enthusiasts. Rocket stoves are a perfect example of simple, effective technology. They meet our needs without waste or complexity.
Start with the basic design from this article. Practice and explore creative uses. Whether for emergencies, outdoor adventures, or new cooking methods, rocket stoves offer practical benefits and valuable knowledge. Your journey to efficient, clean cooking begins now.
FAQ
What exactly is a rocket stove and how does it differ from traditional wood stoves?
A rocket stove is a highly efficient wood-burning cooking device. It achieves nearly complete combustion through its airflow design. Unlike traditional wood stoves, rocket stoves have an open feed tube that allows for abundant oxygen intake.
This design creates a self-sustaining “rocket effect” that pulls air through the system like a powerful blower. You can cook entire meals with just a handful of twigs. It produces minimal smoke and operates with incredible fuel efficiency.
Why do rocket stoves produce so little smoke compared to regular wood fires?
Smoke is unburned fuel, or wasted energy. Traditional wood stoves restrict airflow, leading to incomplete combustion and lots of smoke. Rocket stoves, on the other hand, have a design that draws volatile compounds back into the burn tunnel.
There, they combust again, releasing additional heat energy. This process means that when you see little to no smoke from a rocket stove, it’s a sign of nearly complete combustion and high efficiency.
What is that roaring sound I’ll hear from my rocket stove, and what causes it?
The roaring sound from your rocket stove is a sign of its airflow system working perfectly. The open feed tube allows for abundant oxygen intake into the combustion chamber. As the burn tunnel heats up, it creates a strong updraft.
This updraft creates a self-sustaining “rocket effect” that pulls air through the system with tremendous force. This powerful airflow is what produces the characteristic roar.
Can I really build a rocket stove myself without advanced DIY skills?
Yes, you can build a rocket stove yourself, even if you’re a beginner. It’s a straightforward project that can be completed in just a few hours. You don’t need advanced metalworking skills or expensive tools.
All you need is some basic supplies like cans, insulation materials, tin snips, and a willingness to try. The design is based on proven plans refined by DIY enthusiasts worldwide.
What are the main materials I need to build a homemade rocket stove?
The essential materials for building a DIY rocket stove include metal components, insulation materials, and basic tools. You’ll need a #10 can, standard 28oz cans, and tin snips. You can find most of these materials around the house or for free.
Heavy-duty gloves are also necessary for safety when handling sharp metal edges and working with hot materials during construction.
Where can I find a #10 can for building my rocket stove?
You can find #10 cans at restaurant supply stores, schools, or commercial canneries. They are also available from store-bought institutional products. Look for cans in good condition without excessive rust or damage.
Steel cans work better than aluminum for this application due to superior heat tolerance.
Why is insulation so critical in rocket stove construction?
Insulation is critical for achieving high temperatures needed for complete combustion in your rocket stove. The insulation materials work to retain heat within the burn tunnel. This heat retention maintains the super-hot combustion environment necessary for efficient combustion.
Without proper insulation, the stove won’t reach these critical temperatures. Good insulation makes the difference between a functional, highly efficient stove and one that underperforms.
What tools do I actually need to build a rocket stove, and are there alternatives if I don’t have everything?
Tin snips are the primary cutting tool for rocket stove construction. If you don’t have tin snips, there are alternatives like aviation snips or an angle grinder with a cutting wheel. You can also use a hacksaw for those who prefer a hand tool approach.
Beyond cutting tools, you’ll need basic items like heavy-duty gloves and a marker for marking cut lines. Most people can assemble a rocket stove with items already in their garage or toolbox.
Can I use my rocket stove for more than just camping—what other applications exist?
Your rocket stove is incredibly versatile. Beyond camping and outdoor adventures, you can use it for emergency preparedness, family, and educational purposes. It’s also great for everyday outdoor cooking.
Advanced applications include building larger rocket ovens for baking bread and pizza, creating rocket-powered water heating systems, and setting up outdoor cooking stations. These applications showcase how the rocket stove principles can be adapted and scaled for different purposes.
What kind of fuel should I use in my rocket stove, and how small can the pieces be?
One of the rocket stove’s greatest advantages is that it runs on fuel most people would consider too small or insignificant for traditional fires. Ideal fuel types include small dry twigs, pruned branches, and small fallen branches.
The ideal size ranges from roughly pencil-thick to thumb-thick pieces. This means you can turn small sticks and branches that would normally be waste into powerful cooking heat. The remarkable efficiency will amaze you.
How do I prepare and store fuel for efficient rocket stove operation?
For optimal rocket stove fuel preparation, cut or break pieces to appropriate lengths, typically 6-12 inches. Have a good supply of fuel ready before starting your stove. Store fuel in a dry location where it won’t absorb moisture.
The importance of dry fuel cannot be overstated—damp wood will produce more smoke and won’t burn as efficiently. Keep your fuel supply organized and easily accessible while cooking.
What’s the step-by-step process for lighting my rocket stove?
Start by placing small kindling pieces on the internal shelf. Add tinder material like dryer lint, small dry leaves, or paper to the kindling. Light the tinder and watch as the rocket effect takes over.
You’ll see initial flames develop, then hear the roar as the burn tunnel heats up. From this point, maintain the fire by feeding sticks into the feed tube as they burn down.
How do I control the temperature of my rocket stove while cooking?
Temperature control on your rocket stove is straightforward. Feed more wood for higher heat, or let fuel burn down for lower heat. Remove the pot briefly if things are cooking too fast.
You can also adjust the feed rate to control temperature—pushing wood in more frequently for higher heat or spacing out your fuel additions for gentler cooking. Start with simple projects like boiling water or heating soup to understand how your stove responds.
What safety precautions should I take when using my rocket stove?
Safety is essential when operating your rocket stove. Wear heat-resistant gloves when handling hot cookware. Ensure stable pot placement directly over the heat riser opening.
Keep children and pets at a safe distance from the stove during operation. Use cookware that can handle high heat—cast iron handles rocket stove temperatures exceptionally well. Have a clear area around your stove free of flammable materials.
Can I use regular cooking pots and pans on my rocket stove?
While you can use various cookware, cast iron is highly recommended for rocket stove cooking. It handles the intense heat exceptionally well and distributes heat evenly. Cast iron pans, pots, and Dutch ovens are ideal for this application.
You can use other metal cookware, but avoid thin-walled pans that might warp under the extreme heat. The intense heat output of rocket stoves means cooking happens faster than conventional stoves, so having appropriate cookware that can withstand high temperatures ensures better cooking results and longer equipment lifespan.
How quickly can a rocket stove boil water or cook food?
Rocket stoves are remarkably fast at heating food due to their intense, concentrated heat output. Water can boil in just a few minutes—often faster than you’d expect. Cooking times are generally much shorter than conventional stove cooking.
This speed means efficient meal preparation with minimal fuel consumption. Be prepared to adjust your cooking habits slightly as you adapt to the faster heating. Starting with simple projects like boiling water helps you understand the stove’s capabilities and develop good timing instincts before moving to more complex recipes.
What’s the difference between a portable rocket stove and a larger rocket oven?
A portable rocket stove is compact, weighs about 1 pound, and is perfect for cooking meals quickly. It’s ideal for camping, emergencies, and outdoor cooking. A rocket oven, on the other hand, is a larger, more permanent installation designed for baking bread and pizza.
The oven version can reach temperatures around 350°C and requires proper design and safety considerations. Most beginners start with the basic portable design to master the technology, then explore larger applications like rocket ovens, rocket mass heaters, or outdoor cooking stations once they’re comfortable with the fundamentals.
Are rocket stoves really zero-cost, or will I need to spend money?
Most rocket stove builds can be completed at or near zero cost because the materials are commonly available for free or salvage. #10 cans come from restaurants, schools, and stores. 28oz cans are standard grocery items you likely already have or can save from friends and family.
Insulation can come from your attic (fiberglass), or you might use sand, dirt, or wood ash from your property. Tin snips might already be in your toolbox. While purchasing materials, costs typically remain very low—usually under -30 if buying everything new.
Where can I find more information and connect with other rocket stove builders?
There are thriving online communities dedicated to rocket stove projects. Builders share their creative rocket stove variations and innovative designs. Search for rocket stove forums, Facebook groups, and websites dedicated to sustainable living and DIY projects.
YouTube has excellent video tutorials showing the entire rocket stove building process step-by-step. Organizations focused on emergency preparedness often feature rocket stoves in their recommendations. Connecting with this worldwide community of rocket stove builders and users helps you learn from others’ experiences, discover new applications, and feel part of a larger movement toward sustainable, efficient cooking solutions.
Can I scale up the basic rocket stove design for larger cooking needs?
Yes! The basic DIY rocket stove plans can be modified and scaled for different applications. A larger rocket cooktop can accommodate bigger pots and cook for more people. The principles remain the same—efficient combustion through proper airflow and insulation—but the dimensions expand.
Some builders create multi-burner setups or integrate rocket stoves into outdoor kitchen stations. Most experts recommend starting with the basic portable design to master the technology and understand how it works before attempting larger projects. This foundation knowledge makes scaling and customization much more successful and safer.
How does a rocket mass heater work, and is it something a beginner can build?
A rocket mass heater uses the same efficient combustion principles as a cooking rocket stove but directs the heat through a thermal mass (usually made from bricks, stone, or clay) that slowly releases warmth to heat a room or small building. This is an advanced application requiring more sophisticated design and construction than a basic cooking stove.
While beginners should start with the portable rocket stove, learning that design thoroughly prepares you for eventually building a rocket mass heater. These systems can heat entire rooms with minimal wood, making them excellent for emergency preparedness and sustainable living. Many online resources detail rocket mass heater construction for those ready to progress beyond basic rocket stove building.
What makes rocket stoves an example of “appropriate technology”?
Appropriate technology refers to solutions that are accessible, sustainable, and effective for meeting real human needs—and rocket stoves exemplify this concept perfectly. They use simple materials and design principles to solve a fundamental need (cooking food efficiently).
They’re accessible to anyone regardless of budget or technical skill level. They’re sustainable, using small pieces of scrap wood and pruned branches that would normally be waste. They’re effective, providing reliable, efficient cooking for camping, emergencies, and everyday outdoor use. Rocket stoves represent human ingenuity applied to practical problems, embodying the philosophy that the best solutions are often the simplest ones that empower people to meet their own needs.