Getting lost or injured in unfamiliar places can be very scary. Your ability to show where you are can save your life. Learning to signal for help is a powerful skill in survival situations.
Rescue teams search for signals from the air and ground. They look for visual signs, listen for sounds, and watch for body movements. These signs show they need help.
Emergency signaling techniques are skills anyone can learn. You don’t need special training or expensive gear to start. These methods work in forests, deserts, and near water. The key is knowing which ones work best for your environment.
Time is critical in emergencies. The sooner you get noticed, the faster help comes. Every signal you send increases your chances of being found.
Knowing these techniques gives you confidence. It shows you’re doing everything right. This confidence helps reduce your anxiety.
This guide covers four main signaling categories: visual methods, audio techniques, ground-to-air codes, and electronic options. You’ll learn which signals work in forests, deserts, and water environments. We’ll explain universal distress signals that rescuers recognize worldwide.
Real rescue stories show how these methods save lives. Building situational awareness skills for preppers and everyday complements your signaling knowledge. Together, they form a complete safety strategy that protects you and your family.
Whether you’re an experienced outdoorsperson or a casual weekend hiker, understanding how to signal for rescue can turn dangerous situations into successful rescues. Let’s explore the specific techniques that work in different environments.
Table of Contents
Understanding the Fundamentals of Emergency Signaling
When you’re in a survival situation, knowing how to signal for help is key. Emergency signaling is simple: rescuers need to see and understand your message. The best signals use visual, audio, and ground methods together. Learning these basics can save your life, whether you’re lost in the woods or at sea.
The Universal Distress Signal and Why It Matters
The rule of three is central to survival signals worldwide. Rescuers know three of anything means help is needed. This includes three whistle blasts, three fires, or three light flashes.
The SOS signal uses Morse code: three dots, three dashes, three dots. This pattern is recognized through light, sound, or visual markers. It’s a clear signal of distress to anyone trained in rescue.
- Three fires arranged in a triangle (25 meters apart)
- Three whistle blasts separated by pauses
- Three mirror flashes or light signals
- Three gunshots fired at intervals
Communication in Survival Situations: Getting Attention and Sending Messages
Effective signals have two parts. First, grab attention. Second, send a clear message about your location or condition.
Use geometric patterns like straight lines or circles to get noticed. Large fires and bright moving objects work well. Color contrasts and shadow patterns help in dense areas.
Your location and environment guide your signal choice. Open areas and coastal regions need different strategies. Always have both visual and audio signals ready for changing conditions.
Combat vs. Non-Combat Signaling Considerations
Signaling changes in combat situations. In wilderness emergencies, use large, obvious signals on high, clear terrain. Make yourself visible to rescuers from any direction.
In combat, balance rescue chances with capture risks. Choose locations visible from the air but with hiding spots nearby. Always scout the area before signaling to avoid enemies.
| Scenario Type | Signal Approach | Location Strategy | Primary Concern |
|---|---|---|---|
| Non-Combat Wilderness | Large, obvious signals using the rule of three | Highest, clearest terrain visible from all angles | Getting rescuer attention quickly |
| Combat or Hostile | Discreet signals visible mainly from above | Elevated areas with nearby hiding places | Balancing rescue probability with capture risk |
This decision-making is key in survival situations. Knowing your environment and threats helps choose the right signals for your needs.
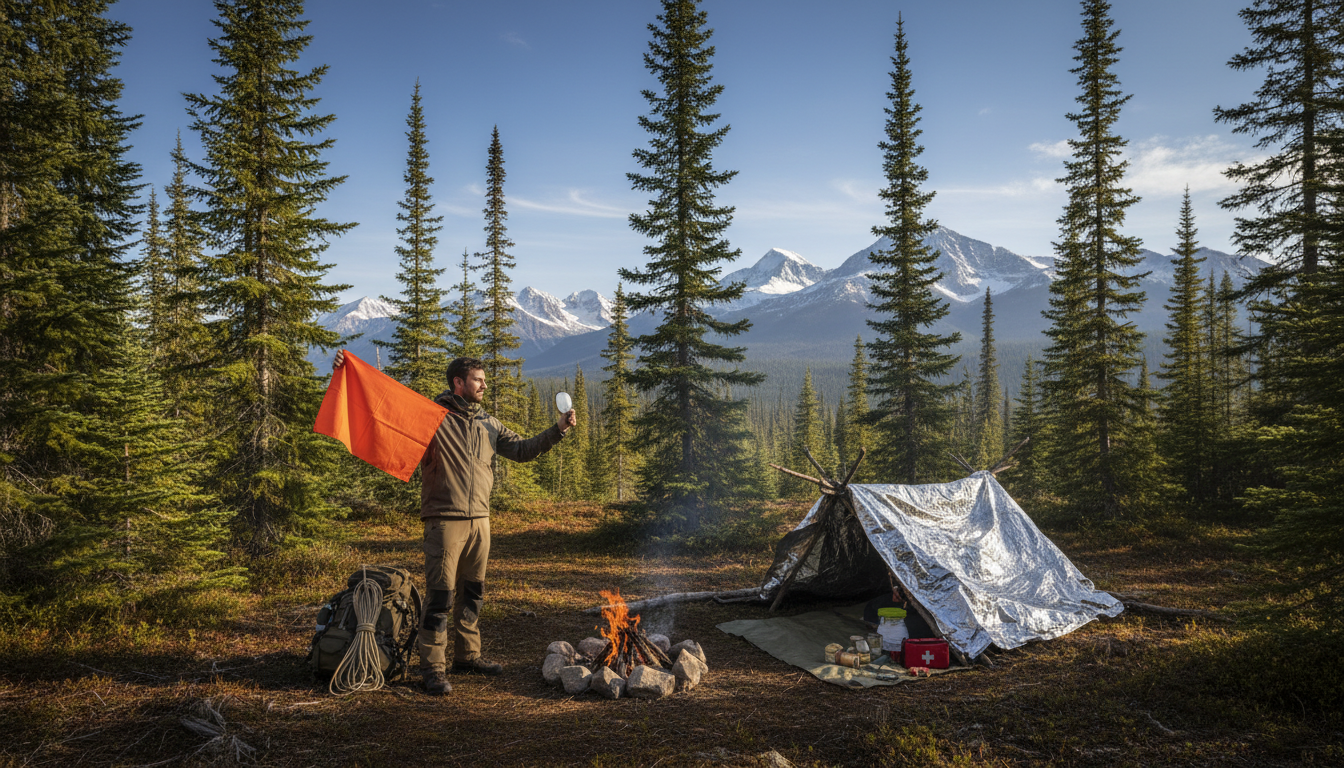
How to Signal for Rescue Using Visual Methods
Visual distress signals are your best bet when lost or stranded. They can be seen from miles away by rescuers. Knowing which visual methods to use can save you from being lost.
Fire and Smoke Signals
Fire is a top choice for nighttime signals. Use three fires in a triangle shape. Make sure each fire is about 25 meters apart.
In snowy areas, clear the ground or build a platform. In jungles, find natural clearings or stream edges for your fires.
Smoke signals are best during the day. Three columns of smoke is the distress signal. Use green leaves or small amounts of water to make white smoke. For black smoke, burn rubber or oil-soaked materials.
Signal Mirrors and Reflective Devices
Signal mirrors are perfect for daytime. They can be seen up to 96 miles away. The MK-3 signal mirror has aiming instructions.
Even without a mirror, you can use a polished canteen cup or belt buckle. Catch the sun’s reflection on your palm or between your fingers in a V-shape. Move the mirror back and forth to signal your position.
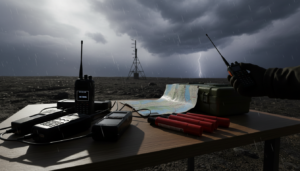
Pyrotechnic and Panel Signals
Flares and smoke grenades give strong signals when you need help fast.
| Signaling Device | Height Reached | Visibility Range | Best Use |
|---|---|---|---|
| Pen Flare (M185) | 150 meters | Several kilometers | Close-range visibility |
| Gyro-jet Flare | 300 meters | Several kilometers | Penetrates tree canopy |
| Star Cluster Flare | 200-215 meters | Several kilometers | Red for international distress |
| Star Parachute Flare (M126 red) | Higher altitude | 48-56 kilometers at night | Extended visibility periods |
| VS-17 Panel | Ground level | Visible from aircraft | Daytime signaling devices for rescue |
| Sea Dye Marker | Water surface | 11 kilometers from 2000 feet | Water survival situations |
The VS-17 panel is great for ground signals. Place the orange side up for better visibility. Spread bright clothing in geometric patterns on the ground.
Creating Effective Visual Signals
Building shadow-casting mounds makes your signals stand out. Orient them north to south for better shadows. Use contrasting materials. Sea dye markers work well on snow, visible for about three hours.
- Clear ground or build platforms in snowy areas
- Select isolated trees for fire signals to avoid forest fires
- Choose calm, clear days for smoke signals
- Keep signal mirrors on a cord around your neck
- Arrange objects in geometric shapes for aircraft visibility
- Use bright colors that contrast with surroundings
These visual methods help you get spotted quickly. Use multiple signals for the best results.
Audio Signaling Techniques for Different Terrains
When it’s foggy, dark, or very dense, sound is your best friend. It can go through things that block your view. This makes sound signals key for getting help in tough places.
Creating a good sound plan means knowing what sounds travel far. The three-blast signal is known worldwide. Keep repeating it every few minutes to make sure rescuers find you.
Whistles: Manufactured and Carved Alternatives
Whistles are top-notch for making sounds that can be heard far away. They can reach up to 1.6 kilometers. Commercial whistles are better than shouting because they make clearer sounds.
The distress signal is three sharp blasts, then a pause, and repeat. This signal tells rescuers you need help.
You can make a whistle from a green branch. Here’s how:
- Find a green branch about thumb-thickness and 10-12 centimeters long
- Create an angled notch at one end to direct airflow
- Hollow out the bore carefully using a small stick or knife
- Test and adjust until you hear a clear, sharp tone
Carved whistles save your voice and go farther than shouting. They’re great for when you need to save energy.

Using Gunshots and Other Noise-Making Methods
Gunshots are a recognized signal when fired in a specific way. The code is three shots at different times. This tells rescuers you’re in trouble.
Important: Don’t use gunshots in areas with enemies. It could get you in trouble.
Drumming on logs or rocks makes sounds that travel far in forests. The sound bounces off trees and reaches searchers better. Use the same pattern as the whistle signal.
When rescuers are close, shout to get their attention. Call out in patterns of three, then pause to listen. This saves your voice for the rescue’s end.
Survival radios like the AN/PRC-90 and AN/PRC-112 send signals for help. They work best when:
- You transmit from clear, unobstructed terrain
- Antennas point at right angles to receiving aircraft
- Your radio sits upright on elevated surfaces
- Antennas never touch clothing, body, foliage, or ground
- You conserve battery power between transmissions
- You keep batteries warm in cold weather
The SARSAT system helps in emergencies. It connects you to searchers when you signal for 30 seconds.
Using different sounds together increases your chances of being found. Whistles, drums, and radios together make sure rescuers hear you, no matter where you are.
Environment-Specific Rescue Signaling Strategies
Different outdoor places need different rescue signals. What works in a forest might not work in a desert. Knowing how to adapt your signals to your surroundings is key to getting rescued fast.
Signaling in Wilderness and Forest Environments
Forests and dense vegetation make it hard for rescuers to spot you. Your signals must break through or rise above the trees. Look for open spots like stream edges or meadows where rescuers can see you.
If no clearings are around, you might need to create one. This is hard work but could save your life. Fire is a powerful signal in forests. Build a fire on a tree trunk or in its lower branches. Green trees can burn well, making thick smoke that rises above the trees.
Ground signals also work in forests. Cut patterns into the vegetation to stand out. Sear the ground to show dark soil. Use branches or rocks to make big symbols. Learn how to signal help by studying how shadows from brush mounds can be seen from above.
Desert and Open Terrain Signal Techniques
Deserts offer different challenges. Space is vast, and obstacles are few. Smoke signals work differently here. They stay close to the ground but can be seen from far away because there’s nothing to block the view.
Make your signals stand out in deserts. Use dark smoke against light sand or light smoke against dark rocks. Ground signals are very effective here. Big symbols made from boulders or disturbed soil can be seen from far away.
Align your signals north to south. This makes them more visible by using sun shadows. Use whatever you find to make your signals. Dark rocks on light sand or light rocks on dark terrain. Make clear patterns that aircraft can recognize.
| Environment Type | Best Signal Methods | Key Advantages | Primary Challenges |
|---|---|---|---|
| Forests and Wilderness | Tree torches, ground patterns, signal fires in clearings | Smoke rises above canopy, multiple signaling layers possible | Dense vegetation blocks visibility, need to find or clear space |
| Desert and Open Terrain | Ground symbols, smoke signals, fire beacons | Unobstructed visibility across vast distances, high contrast possible | Extreme heat, limited fuel sources, harsh conditions |
| Water and Maritime | Sea dye markers, flares, signal mirrors, colored tarps | Visible over long distances, multiple day and night options | Wind and waves affect visibility, limited equipment on rafts |
Water Survival and Maritime Distress Signals
Water requires special rescue signals. Sea dye markers are your main daytime signal on the ocean. They’re visible to aircraft at 2,000 feet and over 11 kilometers away. They last about three hours, but rough seas can reduce their effectiveness.
To use a sea dye marker, keep it wrapped until needed. Dip it in water to create a 30-meter slick. Only use markers when you see or hear aircraft. Don’t waste them on empty skies. Spread your markers over time to increase your chances of being spotted.
The MK-13 and MK-124 signals are common on aircraft and life rafts. They have two uses. Use the orange smoke end during the day. It makes visible smoke for about 15 seconds. Flip it for the flare end at night. Night flares burn for 20 to 25 seconds. Hold these signals by the far end to avoid burns.
- Sea dye markers work best in daylight hours
- Flares and signal devices function well at night
- Signal mirrors reflect sunlight to distant rescuers
- Colored tarps and life jackets attract attention through movement
- Keep multiple signal methods available as backup options
Don’t throw away signal devices after using one end. The other end is ready for the next time. Many survivors owe their lives to having backup signals. Water survival situations need preparation and patience. Use your signals wisely.
Ground-to-Air Emergency Codes and Body Signals
Clear communication is key when rescue aircraft search for survivors. Ground-to-air emergency codes are a universal language that works everywhere. These signals help your message get through, even when words don’t.
The international ground-to-air code has five symbols that survivors can make on the ground. Each symbol sends a different message to pilots above. Learning these signals and practicing them can save lives during a crisis. The international ground-to-air signaling code offers detailed guidance on these critical techniques.
Creating Visible Ground-to-Air Signals
Size is important for ground signals. Your symbols should be at least 4 meters wide by 6 meters long. Arms or legs of each symbol should be 1 meter wide and 1 meter high. This size ensures visibility from high altitudes.
Contrast is key for your signal to stand out. Dark materials against light sand or bright strips against dark soil work well. Use whatever you find: wreckage, logs, rocks, leaves, or trampled snow. Your human precision makes signals instantly recognizable to pilots.
Place signals in open areas for easy spotting. If hiding, dig signals into the ground as trenches. This makes them hard to see from the ground but clear from above.
| Signal Symbol | Meaning | When to Use |
|---|---|---|
| V | Need assistance but can move | Mobile survivors requiring help |
| X | Severely injured, cannot move | Immobilized or unable to proceed |
| Y | Yes or affirmative response | Answering pilot’s loudspeaker questions |
| N | No or negative response | Declining pilot’s suggestions |
| F | Need food and water | When supplies are critical |
Body Signals and Positioning
Body signals are your tool when rescue aircraft are close. These positions send messages without sound or ground preparations. Practice these moves so they become automatic under stress.
- Both arms raised overhead means you need help or want pickup
- One arm raised with the other down signals need for mechanical assistance
- Both arms spread horizontally indicates medical assistance needed
- One arm waving means all survivors are okay
- Lying flat on the ground communicates urgent medical emergency
These body positions are vital when SOS signal procedures need quick clarification. The pilot can understand your situation from above without needing words or complex ground arrangements.
Panel Signals and Aircraft Recognition
Panel signals use life raft covers, sails, space blankets, or combat casualty blankets in specific patterns. These colored materials create visibility contrasts visible from aircraft. Arrange panels according to the international code symbols to transmit detailed information about your situation and needs.
Aircraft pilots acknowledge they’ve spotted you through specific actions. Fixed-wing aircraft indicate recognition by flying low over your position, rocking their wings side to side, or flashing exterior lights. In low-light conditions, pilots may flash green lights or turn landing lights on and off twice. Once the pilot acknowledges your initial signal, prepare to relay additional details about your condition, the number of survivors, injuries, or hazards in your area.
Knowing these ground-to-air communication systems can greatly increase your rescue success rate. These emergency signaling techniques work universally, require no special equipment, and can be learned and practiced before emergencies occur. Be ready with this knowledge, and you’ll communicate clearly with rescuers when it matters most.
Conclusion
Learning how to signal for rescue is a lifesaving skill. It’s not just something to read and forget. Every outdoor lover should know these methods before venturing into the wild.
The techniques shared in this article are real tools for emergencies. Being ready turns fear into confidence when it matters most.
This article discussed four main ways to signal for help. Visual signals like fires and mirrors work best in daylight. Audio signals, like whistles, travel well through forests and obstacles.
Each environment requires different methods. Forests, deserts, and water need different approaches. Ground-to-air codes and body signals let you communicate with rescue planes.
The rule of threes is key. Three fires, three whistle blasts, or three mirror flashes signal distress worldwide. This pattern is recognized everywhere.
Being smart about preparation is key. Practice these methods before your next outdoor trip. Try using a signal mirror on a sunny day.
Learn the three-whistle-blast pattern until it’s second nature. Always carry a whistle, mirror, bright clothes, and a flashlight. Tell friends or family about your plans and what devices you carry.
Planned signaling boosts your chances of rescue. Stay calm and signal from one spot. This helps search teams find you.
Signal responsibly to avoid wasting rescue resources. False alarms can have legal consequences.
You now know how to signal for help in various environments. Whether hiking, exploring deserts, or on water, you’re prepared. Every outdoor adventure is safer with this knowledge.
Stay visible in open areas. Use consistent patterns. Choose signals based on weather and daylight. Your preparation could save you tomorrow. Safe travels, and may you never need these methods, but knowing them brings peace of mind.
FAQ
What is the rule of threes in rescue signaling, and why is it so effective?
The rule of threes is a universal distress signal. It uses three of anything, like three whistle blasts or three fires. This pattern is effective because natural phenomena rarely occur in groups of three. It makes the signal immediately recognizable as human-made.
Rescuers worldwide recognize this pattern, making it one of the most reliable emergency signaling techniques for attracting attention.
How does the SOS signal procedure work, and can it be transmitted without a radio?
The SOS signal uses Morse code patterns of dot-dot-dot, dash-dash-dash, dot-dot-dot. While traditionally transmitted via radio, this pattern can be conveyed through visual signals like mirror flashes or light beams. The key is maintaining the rhythmic pattern so rescuers recognize it as a deliberate distress call.
What’s the difference between attention-getting signals and location-conveying signals?
Attention-getting signals are designed to make rescuers aware that someone needs help. Geometric patterns, large fires, and bright moving objects accomplish this. Location-conveying signals work after attention is established and communicate your specific position and condition.
Both stages are critical: grabbing attention first, then communicating your specific needs and location.
Are there different signaling strategies for combat versus peaceful wilderness emergencies?
Yes. In peaceful wilderness emergencies, rescuers are friendly, so using the largest, most obvious signals on the highest, clearest terrain available maximizes rescue probability. In combat or hostile situations, survivors must balance rescue chances against capture risk.
They should select sites visible from air but with nearby concealment. Using terrain features to mask signals from adversaries is also important. This critical decision involves assessing whether the risk of enemy discovery outweighs the benefit of increased rescue visibility.
Why are visual distress signals often considered the most effective rescue method?
Visual signals can be spotted from miles away, making them ideal for connecting isolated individuals with rescue aircraft. Signals like fires, smoke, mirrors, and ground-to-air codes are visible across vast distances and altitudes. This makes them ideal for connecting isolated individuals with rescue aircraft.
How should I build the three-fire triangle pattern for nighttime distress signaling?
The international standard three-fire triangle uses three separate fires arranged in a triangular formation with approximately 25-meter spacing between each fire. Build each fire with sufficient fuel to burn brightly and consistently throughout the night.
Important practical considerations include clearing snow or wet vegetation around the fire sites to prevent extinguishment. Place fires on high ground for maximum visibility, and ensure each fire is isolated to prevent uncontrolled spread.
What are the advantages of using smoke signals, and how do I generate the right color smoke?
Smoke signals work best during daytime and in calm, clear conditions, remaining visible across open terrain. White smoke is generated by adding green leaves, moss, or small amounts of water to existing fires and works best against dark backgrounds like forests or rock formations.
Black smoke is created by adding rubber or oil-soaked materials and contrasts better against light backgrounds like desert sand or snow. Choose your smoke color based on the terrain background, and remember that smoke hangs lower in desert environments than in forested areas.
How effective is mirror signaling, and what’s the impressive visibility range?
Mirror signaling is described as your best rescue signal device on sunny days, with visibility ranges up to 160 kilometers under ideal conditions. The MK-3 signal mirror uses sighting instructions printed on its surface, while improvised mirrors use any reflective surface.
The hand-aiming method involves catching the reflection on your palm or between two fingers in a V-shape, then moving the mirror rhythmically between your hand and the target. Wear the mirror on a cord around your neck with the glass side against your body to prevent accidental flashing.
What are the different types of pyrotechnic signaling devices, and what are their specifications?
Pyrotechnic devices include pen flares (M185 reaching 150 meters), gyro-jets (300 meters with better canopy penetration), star clusters (red for international distress reaching 200-215 meters height), and star parachute flares (M126 red burning 50 seconds, M127 white burning 25 seconds, visible 48-56 kilometers at night).
The MK-13 and MK-124 dual-purpose signals offer orange smoke for daytime visibility and flares for nighttime use, with both ends remaining usable. These devices significantly increase rescue probability in dense terrain and low-visibility conditions.
How do I use the VS-17 panel effectively, and what are improvised alternatives?
The VS-17 panel should be deployed with the orange side facing upward for maximum visibility from aircraft. If you don’t have a commercial panel, bright orange or violet cloth serves as effective improvised alternatives. Spread regular clothing in geometric patterns—straight lines, X shapes, or other angular formations—to create contrast against natural backgrounds.
The key is size, contrast, and geometric precision: nature doesn’t create perfect straight lines or sharp angles, so these human-made patterns are immediately recognizable as distress signals.
Are sea dye markers really safe to use, or do they actually attract sharks?
Sea dye markers are safe and potentially life-saving tools. They’re visible over 11 kilometers from aircraft at 2,000 feet altitude and remain effective for approximately three hours. U.S. Navy research has found no scientific data supporting the persistent myth that dye markers attract sharks, so survivors should not fear using this critical signaling device.
The technique involves dipping the marker bag in water until a 30-meter slick appears, and using markers strategically when aircraft are heard or sighted. This approach ensures maximum visibility and effectiveness.
Why is whistle signaling considered excellent for close-up rescue communication?
Manufactured whistles are superior to human whistling because they produce consistent, sharp tones that carry up to 1.6 kilometers through obstacles that would muffle voice signals. The three-blast pattern (repeated every few minutes) signals distress universally and conserves vocal energy compared to shouting.
Even without commercial whistles, survivors can carve effective alternatives from green branches or reeds by creating the proper airway, hollowing the bore, and adjusting until a clear sharp tone emerges. A whistle’s effectiveness lies in its piercing frequency that penetrates fog, dense forest, and other barriers.
How do I carve a functional whistle from natural materials in a wilderness emergency?
Find a green branch approximately thumb-thickness and 10-12 centimeters long. Create an angled notch for the airway opening, hollow the bore through the length of the branch using a sharpened stick or knife, then adjust the internal dimensions until a clear sharp tone emerges.
The key is maintaining consistent bore width and proper notch angle. This skill saves your voice and actually carries farther than shouting, making it an invaluable emergency signaling technique when commercial whistles aren’t available.
Is the three-gunshot distress signal universally recognized, and when should I use it?
Three gunshots separated by distinct intervals is a recognized distress signal in peaceful wilderness emergencies. Do not use this method in hostile territory where gunshots attract enemies. In appropriate situations, the three-shot pattern at distinct intervals signals distress clearly.
Alternative noise-making methods include drumming on hollow logs or rocks in wooded areas, where sound echoes farther than shouting. Always maintain the three-pattern rhythm and avoid this method if evading hostile forces.
How does radio equipment like the AN/PRC-90 and AN/PRC-112 work for emergency signaling?
Survival radios transmit both tone and voice signals, making them effective audio distress communication tools. Key technical tips include: transmitting only in clear, unobstructed terrain; keeping antennas at right angles to receiving aircraft for maximum signal strength; placing radios upright on elevated surfaces when using tone capability.
Ensure antennas never touch clothing, body, foliage, or ground (which drastically reduces range); conserve battery power by turning off when not transmitting and keeping messages short; protect batteries from cold (keep inside clothing) and extreme heat (prevents explosion risk); and maintain equipment dryness despite waterproof design.
What is the SARSAT system and how do I activate it in an emergency?
SARSAT (Search and Rescue Satellite-Aided Tracking) is a system that can be activated by keying your emergency transmitter for a minimum of 30 seconds in peacetime emergencies. This system automatically alerts rescue coordination centers and directs response teams to your location. Having emergency radio equipment capable of SARSAT activation significantly increases rescue probability, even in remote areas where visual and audible signals might not reach nearby rescuers.
How should I adapt my signaling strategy for dense forest or jungle environments?
In forest environments, rescuers above cannot see through canopy and vegetation, so finding natural clearings, stream edges, or riverbanks becomes critical for signal placement. If no natural clearing exists, you may need to clear an area yourself—a last resort requiring significant energy expenditure.
The tree torch technique is effective: setting isolated pitch-bearing trees afire or building dry wood fires in lower branches of other tree types to ignite foliage, creating highly visible nighttime beacons. Remember to select isolated trees to prevent uncontrolled forest fires. Ground signals using cut vegetation patterns or seared ground create visible contrast when canopy is thick.
What signaling techniques work best in desert and open terrain where conditions are extreme?
In desert environments, smoke signals hang close to the ground but remain spottable by pilots across open terrain due to lack of visual obstacles. Create maximum contrast by using dark smoke against light sand or light smoke against dark rock formations. Ground signals become effective in open terrain—large symbols made from rocks, vegetation, or disturbed soil are visible from great distances and altitudes.
Use boulders, vegetation, or seaweed to form symbols or messages in sand, ensuring north-south orientation to maximize sun shadow contrast for pilot recognition from directly above.
How do maritime distress signals differ from wilderness signaling, and what equipment should I have?
Maritime distress signals use sea dye markers as the primary daytime signal—visible over 11 kilometers from aircraft at 2,000 feet altitude and remaining conspicuous for approximately three hours. The MK-13 and MK-124 dual-purpose signals are standard on aircraft and life rafts, providing orange smoke for daytime use and flares for nighttime distress signaling.
Hold these devices by the far end not being used to prevent burns, and remember that after expending one end, the other remains available. Additional equipment includes emergency radios, signal mirrors, and bright clothing for panel signals using life raft covers or sails.
What are the minimum dimensions for ground-to-air emergency codes, and why is size so important?
Ground-to-air emergency symbols must be minimum 4 meters wide by 6 meters long, maintaining a 2:3 ratio if making larger symbols, with arms or legs being 1 meter wide and 1 meter high. These proportions ensure visibility from high altitudes where search aircraft operate (typically 500-1,000 feet or higher).
The critical importance of size lies in visibility—symbols smaller than these minimum dimensions may be unrecognizable from aircraft altitude. Geometric precision with straight lines and sharp corners is essential, as these features don’t occur naturally, immediately identifying signals as human-made distress calls.
What construction materials can I use to create ground-to-air signals, and what provides the best contrast?
Improvise symbols from anything available: aircraft wreckage parts, logs, rocks, leaves, stripped branches, trampled snow, or disturbed soil. Contrast is critical—the signal must stand out dramatically against the ground surface, which means dark materials on light backgrounds and light materials on dark backgrounds.
Size, ratio, angularity, straight lines, and square corners are critical because nature doesn’t create these geometric formations, making them immediately recognizable as human-made distress signals. If evading hostile forces, dig signals as trenches or depressions to reduce visibility from ground level while remaining visible from directly above.
What body signals and positions do rescue pilots recognize as distress communication?
Standard body positions communicate different messages internationally: both arms raised signals “pick us up,” one arm raised with other down indicates “need mechanical help,” both arms horizontal means “need medical assistance,” one arm waving communicates “all OK,” and lying down signals “need medical assistance urgently.” Practicing these positions ensures automatic execution during high-stress rescue moments.
When aircraft come close enough for pilots to see individual humans, body signaling becomes your primary communication method for conveying urgent conditions or specific needs.
How do panel signals using life raft covers or space blankets communicate messages to pilots?
Panel signals involve arranging materials like life raft covers, sails, VS-17 panels, space blankets, or combat casualty blankets in specific patterns that convey different messages to pilots. These arrangements use geometric symbols and angular formations to create contrast against backgrounds.
The consistent color and size of panels make them easily recognizable from aircraft, and their arranged pattern communicates specific information about survivor condition, needs, or hazard warnings. This system provides critical backup communication when radio contact isn’t available.
How do I know when a rescue aircraft has spotted my distress signal?
Aircraft acknowledgment procedures include fixed-wing aircraft flying low over your position, rocking wings, or flashing lights in specific patterns. Once a pilot acknowledges your initial distress signal, be ready to relay additional information about your condition, number of people, injuries, or hazards in the area.
If a radio is available, establish contact using the beacon for 15 seconds, voice transmission for 15 seconds (Mayday, Mayday, Mayday—this is call sign), then listen for 15 seconds. Once contact is made, provide your call sign, name, and location to guide the pilot’s response.
What is the aircraft vectoring procedure, and how does it help rescue teams locate me?
The aircraft vectoring procedure establishes initial contact by transmitting beacon signals for 15 seconds, voice for 15 seconds (using “Mayday, Mayday, Mayday” and your call sign), then listening for 15 seconds for pilot response. Once contact is established, provide your call sign, name, and specific location details to guide the pilot to your exact position.
This procedure ensures rescue aircraft can triangulate your position and coordinate response teams effectively. Maintaining consistent signal output and staying in one location allows search grids to work efficiently and prevents rescue teams from expanding search areas unnecessarily.
Should I stay in one location while signaling for rescue, or should I try to move toward potentially rescuers?
You should stay in one location once you begin active signaling for rescue. Staying put allows search grids to work effectively—rescuers establish systematic search patterns and will locate you more efficiently if you remain stationary. Moving around breaks signal continuity and makes it harder for rescue teams to pinpoint your location.
Remaining in a visible, signaling position with established markers makes you easier to find than moving through terrain while trying to signal simultaneously. Inform trusted contacts about your planned route and expected return time before departing, so rescue teams know where to focus initial searches.
What universal principles apply across all rescue signal methods regardless of environment?
Universal signaling principles include: the rule of threes (three fires, three whistle blasts, three flashes) as the international distress pattern; the importance of contrast and visibility against natural backgrounds; the need to have multiple signal types ready as conditions change; choosing