Learning to set up a tarp shelter opens up new camping possibilities. Tarp shelters are light, compact, and keep you dry. They weigh about one pound and fit in your backpack. Plus, they’re quicker to set up than tents, protecting you from rain, wind, and sun.
Whether you’re new to camping or experienced, knowing how to build a shelter is key. A wilderness survival shelter doesn’t have to be hard. With some knowledge and practice, you can make a shelter that keeps you dry and comfy.
This guide covers everything about setting up a tarp shelter. You’ll learn what gear you need, how to tie important knots, and how to build different shelters. Some designs are better for certain weather, while others are for emergencies.
Start in your backyard or a local park. Practicing at home helps you get better before venturing into the wild. Tarp shelters have their limits. They won’t keep bugs out unless you add a mesh net. Beginners might find them less stable than tents at first. But, practice makes a big difference.
Ready to learn outdoor shelter building? This complete tarp shelter setup guide has everything you need to start. You’ll feel confident knowing you can build protection anywhere you camp.
Table of Contents
Why Tarp Shelters Are Essential for Outdoor Adventures
Tarp shelters are a big deal for outdoor lovers who want something reliable but light. They’re perfect for weekend trips or emergency situations in the wilderness. A good tarp shelter keeps you safe, flexible, and worry-free when regular gear won’t do.
Lightweight Protection from the Elements
One key benefit of a tarp shelter is how light it is. Most tarps weigh just one pound, unlike tents that can be 3 to 5 pounds or more. This is important when you’re carrying your gear for long distances.
These tarps are made from strong materials like coated nylon and silnylon. They keep you dry and safe from the sun and wind. The design also helps water run off, so you stay dry.
- Weighs significantly less than traditional tents
- Resists water and wind effectively
- Sets up quickly in emergencies
- Performs well in extreme weather conditions
Versatility Compared to Traditional Tents
Tarps are way more flexible than tents. You can set them up in many ways, depending on the weather and where you are. This makes tarp camping great for different outdoor situations.
Tarps are faster to set up and let in more air, so you can see around you better. You can change how they’re set up as the day goes on. It takes some practice to get used to, but it’s worth it.
| Feature | Tarp Shelter | Traditional Tent |
|---|---|---|
| Weight | 1 pound | 3-5+ pounds |
| Setup Time | 5-10 minutes | 10-15 minutes |
| Configuration Options | Multiple angles | Fixed design |
| Ventilation | Excellent | Limited |
| Bug Protection | None (without net) | Full enclosure |
| Weather Resistance | High with proper technique | High with sealed seams |
Learning how to use tarps opens up new adventures in the wilderness. Start with simple setups, practice at home, and get more confident before venturing into the wild.
Essential Gear and Supplies for Building Your Tarp Shelter
Before you go camping, you need the right gear. Knowing what you need for a tarp shelter is key. You don’t have to spend a lot or get complicated stuff. A few simple items will help you build a shelter that keeps you dry and warm.
The first thing you need is a tarp. Tarps come in different sizes, depending on how many people you’re camping with. A 6-by-8 foot tarp is good for one person, while an 8-by-10 foot tarp is better for two. Most tarps weigh about one pound and have loops for easy setup.
Core Items You’ll Need
- Lightweight cord or paracord — about 50 feet total for ridgelines and guy-outs
- Stakes — 4 to 6 ultralight stakes (titanium sets weigh just 1 ounce for four stakes)
- Trekking poles — serve double duty as shelter supports
- Tarp material — silnylon and Cuben Fiber both work well
- Guylines — usually pre-attached to quality tarps
Choosing the right material is important. Don’t use Mylar space blankets because they tear easily. Instead, go for tarps made from coated nylon, silnylon, or Cuben Fiber. These materials can handle the weather and last for many camping trips.
You don’t have to spend a lot on good tarp gear. Start with the basics and add more later if you want. You can use rocks instead of stakes and trekking poles for both walking and setting up your shelter. Your first tarp shelter will teach you what works best for you.
Must-Know Knots for Secure Tarp Camping Techniques
Learning the right camping knots makes your tarp setup solid. You don’t need to learn many knots. Focus on a few key ones that work in any weather or light. Practice these knots at home until your hands remember them.
Try tying them while watching TV or during lunch. When you’re in the field, your fingers will move on their own.
The difference between a saggy shelter and a tight, weatherproof one is mastering certain knots. These tarp knot techniques keep your shelter tight even when the cord stretches or the weather changes.
The Taut-Line Hitch for Adjustable Tension
The taut-line hitch is great for keeping ridgelines and guylines tight. This knot slides along the cord, letting you adjust your shelter as needed.
How to tie the taut-line hitch:
- Wrap your cord around the anchor point three times
- Thread the working end back through the loops you created
- Pull the knot tight against the anchor
- Slide the knot up or down to adjust tension
This knot prevents your tarp from sagging when wet or stretching in the wind. It’s essential for any camping adventure.
Bowline and Figure-Eight Knots for Quick Attachments
The bowline creates a fixed loop that won’t slip under load. The figure-eight on a bight offers similar strength with a different feel. Both are perfect for attaching corners to anchor points.
Fast attachment method with cord:
- Feed cord through the corner grommet or tie-out point
- Insert a short, sturdy stick through the loop
- Pull the stick tight against the tarp fabric
- This creates secure, quick-release attachments
Or, tie a bowline or figure-eight loop and attach directly to your anchor. This method is popular because you can remove it fast. The loop knots provide dependable security for essential camping knots when you need permanent attachments.
| Knot Type | Best Use | Adjustment | Speed |
|---|---|---|---|
| Taut-Line Hitch | Ridgelines and guylines | Fully adjustable | Moderate |
| Bowline | Fixed corner attachments | Non-adjustable | Fast |
| Figure-Eight on a Bight | Fixed corner attachments | Non-adjustable | Fast |
| Stick-Toggle Method | Quick temporary attachments | Semi-adjustable | Very fast |
Practice these tarp shelter knots until they feel natural. Your shelter will be stronger, your setup faster, and your camping experience safer.
How to Set Up a Tarp Shelter: Popular Configurations
Choosing the right tarp shelter is key to a good camping trip. Different setups are better for different places. Knowing your options helps you pick the best one for you.
Exploring different tarp setups can open up new adventures. Each has its own strengths for different weather and places. You don’t need to know them all. Most campers stick to 2-3 setups that work best for them.

A good tarp configuration guide shows you options without getting too complicated. Start by trying them out in your backyard. See which ones feel most natural and comfortable to you.
Your Tarp Setup Methods Overview
Here are some popular tarp shelters:
- Ridgeline Tarp — Great for forests; quick and easy for most weather
- A-Frame Shelter — Versatile and stable; uses trekking poles for support
- Lean-To Configuration — Simple and fast for mild weather
- Closed-End A-Frame — Offers better weather protection; keeps wind and cold out
- Tube Tent — Keeps your feet dry from wet ground
- Tarp Tent — Provides full coverage; a bit harder to set up
- Star Tent — Protects your gear; easiest to set up for full coverage
Learning about these setups makes you a more confident camper. Each one has its own role in your camping gear.
The Diamond and A-Frame: Quick Emergency Shelter Building
When bad weather hits fast, you need a quick shelter. The diamond and A-frame designs are perfect for this. They use basic materials and simple steps that anyone can learn. Knowing these quick tarp shelter options means you can handle sudden weather changes.
These emergency shelter building methods are fast and easy. You can make either shelter with gear you probably already have. Just a tarp, cord, and stakes can turn an open area into a safe spot from rain and wind.
Setting Up the Diamond Configuration
The diamond tarp setup is one of the quickest shelters to make. Most people can set it up in under ten minutes with a bit of practice.
Here’s what you need to do:
- Find a sturdy tree with roughly eight feet of open ground around it
- Face the tree with wind at your back for best wind protection
- Tie a cord loop around the tree trunk at chest-to-head height
- Pre-make a fifteen to twenty-foot cord loop at home to save time in the field
- Attach one corner of your tarp to this loop using a bowline, stick-toggle, or direct tie
- Pull the tarp tight and stake the opposite corner firmly into the ground
- Stake down the remaining two corners to create a taut diamond shape
The diamond tarp setup works well because the tree anchors one corner. The other three corners handle the tension. This creates a stable shelter that sheds water well. Practice this setup in your backyard until it becomes second nature.
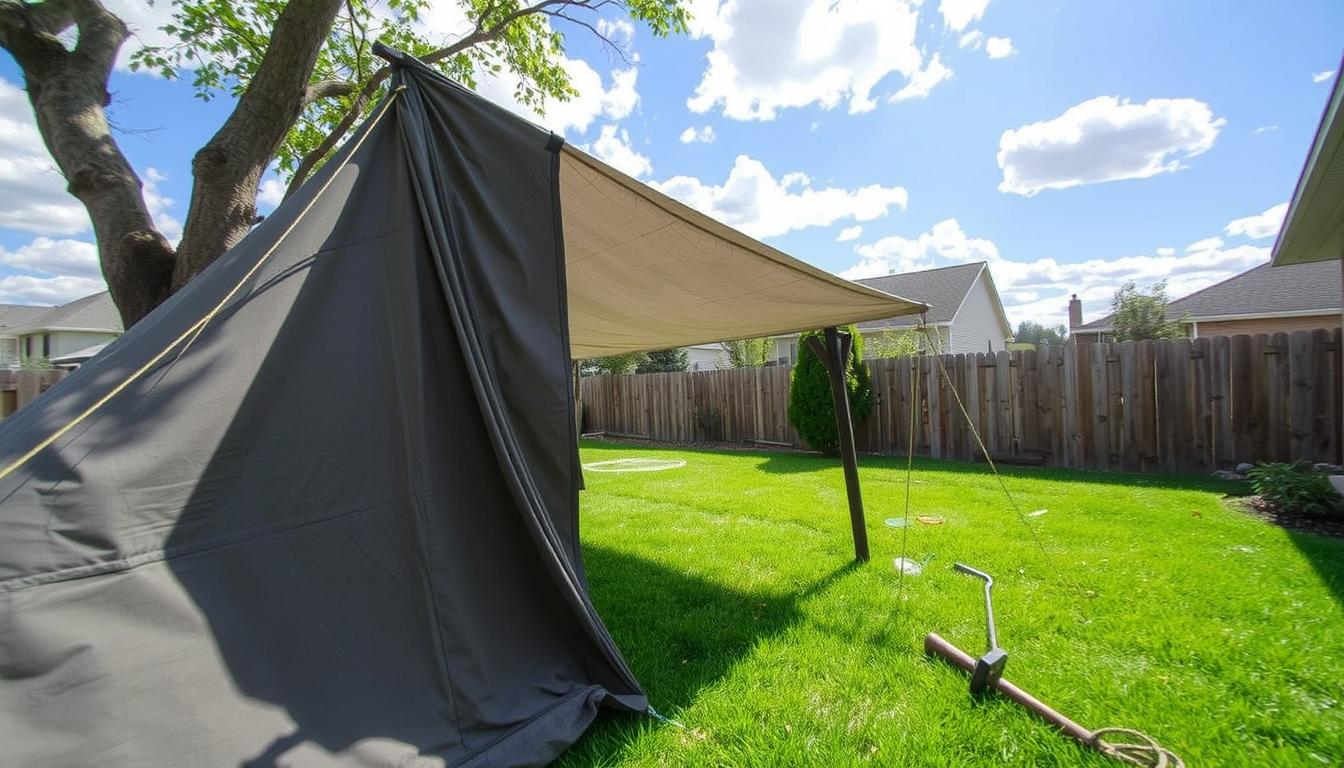
Creating a Stable A-Frame Shelter
The A-frame tarp shelter takes a bit longer to set up than the diamond. But it offers more headroom and space. It works with two trees or two trekking poles.
Setting up with trees:
- Locate two trees positioned ten to fifteen feet apart
- Make sure open ground spreads between them
- Tie cord between trees at waist height to create your ridgeline
- Use a taut-line hitch on at least one end for adjustable tension
- Drape your tarp over the cord, centering it lengthwise
- Stake all four corners into the ground
- Adjust the ridgeline cord for proper headroom
Setting up with trekking poles:
- Adjust both poles to waist or stomach height
- Plant one pole firmly in the ground
- Position your tarp so one shorter side centers over the pole handle
- Attach the tarp to the first pole with cord
- Stake this side down securely
- Repeat the process with the second pole on the opposite side
- Stake all four corners for maximum stability
The A-frame tarp shelter gives you enough room to sit upright and move around. While the diamond setup is faster, the A-frame offers better comfort for longer stays.
| Feature | Diamond Tarp Setup | A-Frame Tarp Shelter |
|---|---|---|
| Setup Time | 5-10 minutes | 10-15 minutes |
| Headroom | Minimal | Good |
| Wind Resistance | Excellent | Very Good |
| Trees Required | One tree | Two trees (or poles) |
| Best For | Quick emergency shelter building | Comfortable extended stays |
| Skill Level | Beginner | Beginner to Intermediate |
Both the diamond and A-frame tarp shelters are essential for outdoor skills. Start by practicing the diamond in your yard during calm weather. Once you’re comfortable with it, learn the A-frame. Having both techniques means you can adapt to any weather.
Advanced Tarp Shelter Configurations for Weatherproof Protection
Once you get the hang of basic tarps, it’s time to try more advanced setups. These designs offer top-notch protection when the weather gets tough. They keep you safe from wind, rain, and cold. Learning these setups takes time, but they’re essential for any outdoor adventure.
Try one new setup each camping trip. This way, you’ll get better and more confident. By the end of the season, you’ll have many options for any weather.
Ridgeline Tarp Shelter
The ridgeline setup is quick and effective. First, tie paracord between two trees, making sure it’s tight. Then, hang your tarp over it. Pull the sides out to form a triangle at the top. Stake the bottom corners down.
- Use guylines to add extra tension
- Place trekking poles under edges for additional support
- Space stakes about three feet from the tarp base
Closed-End A-Frame for Wind Protection
This design blocks wind and keeps you warm. Stake one side down as your back wall. Use a trekking pole to lift the other side, making your entrance. Stake the front corners and tighten with guylines.
This setup keeps rain and wind out. It’s perfect for cold or windy nights.
Tube Tent Configuration
This setup has a built-in floor for wet ground. String paracord between trees about three feet high. Drape your tarp, folding one side to make a floor. Secure with stakes at the base.
The tube tent is great for wet places.
Tarp Tent Design
This design offers tent-like protection. Stake one side down, then lift the center with a trekking pole. Stake the sides in a circle, leaving a gap for entry. Add guylines to secure the entrance.
Practice this with a friend before using it in the wild. It takes time but offers great protection.
Star Tent for Harsh Conditions
The star tent is great for storms. Stake three sides down, spacing stakes three feet apart. Climb under and lift the center with trekking poles or a branch. The open side is your entrance.
For really bad weather, stake the fourth side down too. This low-profile shelter protects you while you wait out the storm.
| Configuration | Best For | Setup Time | Weather Protection |
|---|---|---|---|
| Ridgeline | Quick setups with moderate conditions | 15-20 minutes | Good wind and rain protection |
| Closed-End A-Frame | Cold nights and strong winds | 20-25 minutes | Excellent heat retention and wind blocking |
| Tube Tent | Wet ground and moisture concerns | 15-20 minutes | Ground protection with decent coverage |
| Tarp Tent | Extreme weather and extended camping | 30-40 minutes | Complete tent-like protection |
| Star Tent | Severe storms and quick shelter | 15-20 minutes | Maximum low-profile protection |
These advanced tarp setups are the next step in outdoor shelter mastery. Each design tackles different weather and terrain challenges. Gradually build your skills, and you’ll be ready for any camping adventure.
Tips for Choosing the Right Location and Securing Your Wilderness Survival Shelter
Finding the right spot for your tarp shelter is key to a good night’s sleep. Start by scouting the area for five minutes. Look for flat, dry ground without rocks or roots. These can make your tarp uncomfortable and damage it.
Also, check the sky for dead branches that could fall. Avoid low spots where water might collect. Wind direction is important too. Place your shelter so the closed end faces into the wind for better protection.
Selecting the Best Ground and Tree Placement
Your choice of ground depends on your setup style. For an A-frame, find two sturdy trees 10 to 15 feet apart. For a diamond, look for one strong tree with 8 feet of clear ground around it. Make sure trees are healthy and won’t drop branches.
A complete guide to bushcraft shelters says natural windbreaks keep you warm and protected. In hot weather, choose shaded areas with good airflow. In cold weather, pick a spot where terrain blocks wind.
- Check ground composition before setup
- Verify tree health and spacing
- Consider prevailing wind direction
- Identify overhead hazards
- Look for shade in warm conditions
Staking Techniques for Maximum Stability
Proper tarp staking makes a big difference. Always stake opposing corners first. This creates balanced tension across your shelter. Drive stakes at a 45-degree angle pointing away from your tarp for maximum holding power.
Securing tarp shelter corners takes patience and attention. Position stakes about three feet from the tarp edge when using tie-outs. Start with opposing sides to build even tension, then work on remaining corners.
| Ground Type | Best Staking Method | Stake Depth |
|---|---|---|
| Soft soil | Long stakes or X-pattern cross stakes | 8-12 inches |
| Hard ground | Rocks or deadman anchors buried horizontally | 6-8 inches with horizontal bar |
| Snow | Deadman anchors or wide snow stakes | 12+ inches deep |
| Rocky terrain | Rock stacking or log anchors | Heavy objects weighted down |
After setting up, walk around your shelter and check every connection point. Cord stretches as it settles. Tighten any loose areas within the first hour. Re-tension your shelter if one corner keeps pulling loose. The stake probably needs a better angle or deeper placement.
- Drive stakes at 45-degree angles
- Always start with opposing corners
- Check tension after one hour of setup
- Adjust weak points immediately
- Use available materials like rocks or logs when stakes run short
By following these steps, your shelter will stay safe and functional during your wilderness adventure. Good shelter site selection and securing tarp shelter techniques make a basic setup reliable against weather and elements.
Conclusion
Learning to set up a tarp shelter is a big deal for camping and backpacking fans. It lets you travel light, something tents can’t do. You now know how to build shelters anywhere, thanks to what you’ve learned.
Practice is the secret to being good at tarp shelters. Start in your backyard or a local park. Try out different setups and take them down a lot. This makes it feel second nature.
Having a friend help makes it more fun. Plus, they can lend a hand when you need it. Always check your gear before a trip. Make sure everything is in good shape.
After your trip, store your tarp right. Lay it flat, then fold it up to fit in its bag. This keeps your gear organized for the next time.
Knowing how to set up a tarp shelter makes you ready for anything. You’ll be confident and connected to nature. Your next adventure is just around the corner. Get your tarp and start building today.
FAQ
What exactly is a tarp shelter, and why should I learn how to set up a tarp shelter?
A tarp shelter is a lightweight, flexible camping structure made from a waterproof fabric. It’s stretched and secured between anchor points like trees, trekking poles, or the ground. Learning to set up a tarp shelter is key because these setups offer great weather protection without the weight of traditional tents.
They often weigh just one pound, compared to 3-5 pounds for conventional camping shelters. Whether practicing in your backyard or preparing for wilderness survival, mastering tarp setup skills gives you practical protection and peace of mind in any outdoor situation.
How much weight will I save by using a tarp shelter instead of a traditional tent?
Most quality camping tarps weigh only about one pound. Standard tents typically weigh between 3-5 pounds, depending on size and features. This significant weight reduction is important during extended backcountry trips where every ounce counts.
Materials like silnylon and Cuben Fiber offer excellent weather resistance while maintaining this lightweight advantage. This makes tarps ideal for backpackers focused on minimizing their load.
What size tarp should I buy for my camping needs?
Tarp size depends on how many people will be sheltering under it. For solo camping and backcountry adventures, a 6×8 feet tarp provides adequate coverage. If you’re camping with a partner or prefer more space, consider an 8×10 or 9×10 feet tarp.
Ensure your tarp has quality grommets or tie-out loops that won’t tear under tension during tarp camping techniques.
What materials are best for a weatherproof tarp shelter?
The most reliable materials for weatherproof tarp shelter construction are silnylon (silicon-coated nylon) and Cuben Fiber (also called Dyneema composite fabric). Both offer excellent water resistance and durability. Avoid using Mylar emergency blankets for shelter building, as they tear easily and don’t provide the reliability you need in serious weather conditions.
Quality tarps made from these materials will protect against rain, wind, and harsh sun while lasting for years of use.
How much cordage do I need to set up a tarp shelter?
You’ll need approximately 50 feet of lightweight paracord or similar cord for ridgelines and guy-out points in most tarp shelter configurations. Paracord is ideal because it’s strong, lightweight, and relatively inexpensive. Having extra cordage allows you to adjust configurations based on available anchor points and weather conditions during your camping tarp setup.
Do I really need special stakes, or can I use what I have?
While you can substitute rocks or deadwood in emergencies, ultralight titanium stakes are ideal. A quality set of 4-6 ultralight titanium stakes weighs just about one ounce for four stakes, making them perfect for backpacking. They drive into the ground easily and hold exceptional tension.
For practicing emergency shelter building at home or in mild conditions, basic metal tent stakes work fine for learning tarp shelter configurations.
Can I use my trekking poles as shelter supports?
Absolutely! Adjustable trekking poles serve double duty as shelter supports, making them incredibly versatile gear. Many tarp camping techniques rely on trekking poles to create the ridgeline or A-frame structure. This dual-purpose functionality reduces the total weight you need to carry and simplifies your gear list significantly.
What’s the most important knot for building a tarp shelter?
The taut-line hitch is the essential knot for successful tarp shelter building. This adjustable knot maintains proper tension on ridgelines and guylines while allowing you to tighten or loosen your shelter as weather conditions change or as cordage stretches over time. While you don’t need to be a knot expert, mastering the taut-line hitch will dramatically improve your shelter-building success and confidence.
How do I practice tying tarp shelter knots if I’m a beginner?
Start by practicing these essential knots at home until you can tie them quickly, even in low light or cold conditions. Try practicing while watching TV, during lunch breaks, or at your local park until the motions become second nature. Once you master the taut-line hitch, bowline, and figure-eight knots, you’ll have the foundation for secure tarp camping techniques in any situation.
What’s the difference between a stick-toggle and a traditional knot attachment?
The stick-toggle method is a quick alternative to knots for tarp attachments: you thread cord through a grommet, insert a small stick through the resulting loop, and pull tight. This method is faster than tying knots and works exceptionally well when you need rapid deployment.
Traditional knots like the taut-line hitch and bowline offer more security and adjustability for extended camping situations.
What are the main tarp shelter configurations I should learn?
The most popular tarp shelter configurations include the ridgeline tarp (perfect for forested areas with trees), the A-frame (versatile and stable), the lean-to (quick and simple for mild conditions), the closed-end A-frame (better weather protection), the tube tent (with floor protection), the tarp tent (maximum coverage), and the star tent (emergency protection). Most campers eventually favor 2-3 configurations that work best for their typical camping environments, so you’ll naturally develop preferences as you practice different setups.
How quickly can I set up the diamond configuration in an emergency?
With practice, the diamond setup can be deployed in just minutes, making it ideal for sudden weather changes or emergency shelter building situations. Find a sturdy tree with about 8 feet of clear ground around it, position yourself so the wind is at your back, tie a cord loop around the tree at chest-to-head height, attach one tarp corner to this loop, stake the opposite corner, then stake the remaining two corners to create a taut diamond shape. Practice this configuration in your backyard until you can complete it in under five minutes.
What’s the advantage of the A-frame over the diamond configuration?
The A-frame shelter provides better headroom and more livable space than the diamond, making it more comfortable for extended use. While the A-frame takes slightly longer to set up than the diamond, it’s quick enough for emergency situations. The A-frame also works with either trees (using a ridgeline between two trees at waist height) or trekking poles (centered under the tarp), giving you flexibility in different terrain.
How do I create a weatherproof tarp shelter in cold or windy conditions?
The closed-end A-frame configuration is ideal for harsh weather. This setup creates a “back wall” that blocks wind and retains heat. To construct it, stake the back end first, then use a center pole to create the entrance, positioning everything so the closed end faces prevailing winds. This advanced tarp shelter configuration provides superior protection compared to open designs.
What’s the difference between a tarp tent and a tube tent?
A tube tent uses an asymmetric drape (approximately one-third on one side, two-thirds on the other) with a folded floor that creates ground protection from moisture, making it ideal for wet environments. A tarp tent is more complex but provides tent-like protection with almost complete enclosure. Both are more advanced configurations that offer better weather protection than basic A-frames or diamonds, though they require more practice to set up efficiently.
When should I use a star tent configuration?
The star tent is a low-profile shelter configuration that’s excellent for harsh weather when you just need to hunker down and wait out a storm. This setup is valuable in severe wind or during survival situations where minimizing your profile to the elements is critical. Practice this configuration during your backcountry training so you’re prepared for emergency scenarios.
How do I choose the perfect location for my tarp shelter?
Look for level ground free of rocks, roots, and debris that would make sleeping uncomfortable. Avoid low spots where water might collect during rain, and check overhead for dead branches (“widowmakers”) that could fall. For tree-dependent setups, identify sturdy trees at the right distance apart—about 10-15 feet for A-frames and single strong trees with 8 feet of clearance for diamonds. Position your shelter so the closed end or back faces prevailing winds. Taking an extra five minutes to choose the right location makes hours of difference in comfort and safety.
How do I stake my tarp shelter for maximum stability?
Always stake opposing corners first to create even tension. Drive stakes at a 45-degree angle away from the tarp for maximum holding power. Position stakes about three feet from the tarp edge. In soft ground, use longer stakes or cross two stakes in an X-pattern for better holding power. In hard ground or snow, use rocks, logs, or deadman anchors (burying a stick horizontally beneath the surface). After initial staking, walk around and adjust tension points until the tarp is drum-tight. Check and re-tension after the first hour as cord stretches and settles.
What should I do if my tarp shelter keeps pulling loose at one corner?
If one corner keeps pulling loose, that stake probably needs a better angle or deeper placement. Try driving it deeper into the ground, adjusting the angle to be more perpendicular to the pull direction, or moving the stake further away from the tarp edge. In soft ground, try using a longer stake or creating an X-pattern with two stakes. The issue is usually inadequate stake penetration or improper angle, not insufficient cordage tension.
Should I consider wind direction when setting up my wilderness survival shelter?
Absolutely. Always position your shelter so the closed end or back faces prevailing winds. In hot weather, prioritize shade and good ventilation. In cold weather, consider natural windbreaks like forest cover or hillsides. Taking time to analyze wind patterns and shelter orientation significantly improves comfort and weather protection regardless of your chosen tarp shelter configuration.
What’s the best way to fold and store my tarp for longevity?
Proper tarp folding extends your gear’s lifespan significantly. Lay the tarp flat, grab opposing middle seams, bring the points together, and fold compactly. Store your tarp in a cool, dry location away from direct sunlight and chemicals that could damage the waterproof coating. Proper storage and handling ensure your tarp will last for years of camping adventures and wilderness survival shelter deployments.
Should I practice tarp shelter building before my first backcountry trip?
Definitely. Start in your backyard or local park, setting up and taking down different configurations until the process becomes second nature. Make it a fun weekend activity, perhaps inviting friends or family to learn together—extra hands make learning faster and more enjoyable. Double-check all your gear before any trip, ensuring you have all necessary components and that your cord and tarps are in good condition. This preparation transforms your wilderness survival shelter skills from theoretical to practical.
How can I make learning tarp shelter setup more fun and engaging?
Turn your practice sessions into social activities by inviting friends or family to learn together. Time yourself to see how quickly you can set up different configurations. Challenge yourself to master one new tarp shelter configuration per camping trip. Make backyard practice sessions regular weekend activities. Create a checklist of all configurations you want to master. The more you engage with the learning process, the faster you’ll develop confidence and competence in backcountry tarp shelter building.
What should I do to prepare for emergencies when using a tarp shelter?
Maintain awareness of weather conditions and understand how to adjust your tarp shelter configuration based on changing circumstances. Practice emergency shelter building configurations like the diamond and A-frame until you can deploy them quickly under stress. Double-check that all your gear—tarp, cordage, stakes, and knot-tying knowledge—is in excellent working order before trips. Carry backup cordage, extra stakes, and practice emergency survival shelter techniques regularly. This preparation ensures you’re ready for whatever challenges arise in the backcountry.
How does learning tarp shelter skills connect to broader outdoor competence?
Mastering how to set up a tarp shelter opens up new possibilities for lightweight backpacking adventures and connects you with time-tested wilderness survival shelter techniques used by experienced outdoors people for generations. These skills provide valuable knowledge that could prove critical in emergency situations. Building your shelter-setting abilities makes you a more versatile and confident outdoor adventurer capable of adapting to diverse camping environments and weather conditions throughout your outdoor journey.
What’s the most important takeaway from learning tarp shelter building?
Practice makes perfect. The more you set up and take down different tarp shelter configurations, the more natural and efficient the process becomes. Start simple with the diamond and A-frame, gradually expanding your repertoire with advanced configurations. Eventually, these skills become second nature, and you’ll have the confidence to tackle any camping situation or emergency shelter building scenario that comes your way.